
How to Cream Butter and Sugar Perfectly Every Time
“Creaming” butter and sugar is an essential first step in many baking recipes. Here’s how it’s done.
Dotdash Meredith Food Studios
If you enjoy baking from scratch, chances are you have (or will) come across recipe instructions that direct you “to cream” ingredients together. In fact, for many classic cake and cookie recipes, creaming together butter and sugar is the first order of business listed—after the oven is preheated and pans are prepared, of course. But what exactly does it mean to cream these ingredients?
What Does It Mean ‘To Cream’ Butter and Sugar?
The simplest answer: creaming is a form of mixing the two ingredients together. However, creaming is a distinct mixing technique in baking recipes—most commonly applied to softened butter and granulated sugar—that involves whipping the sugar into the butter at a fairly high speed for an extended period of time. While this can technically be done by hand, because of the velocity and duration of mixing needed, creaming is best accomplished with the aid of an electric hand mixer or stand mixer.
Recipes that instruct you to cream butter and sugar will always require the butter to be softened before any creaming takes place. The reasoning behind this is no mystery: Rock-hard butter doesn’t mix well. That said, it’s important to remember that overly soft butter will also not cream properly. Butter that is too soft will begin to melt further rather than aerate when it is whipped with a mixing tool, and this will ultimately lead you to a dense, greasy dessert. Properly softened butter should hold its shape but easily dent when you press into it with your finger, and it should still be cool to the touch. If your stick of butter is weeping oil onto the countertop, that’s a sure sign it’s been sitting out for too long.
Dotdash Meredith Food Studios
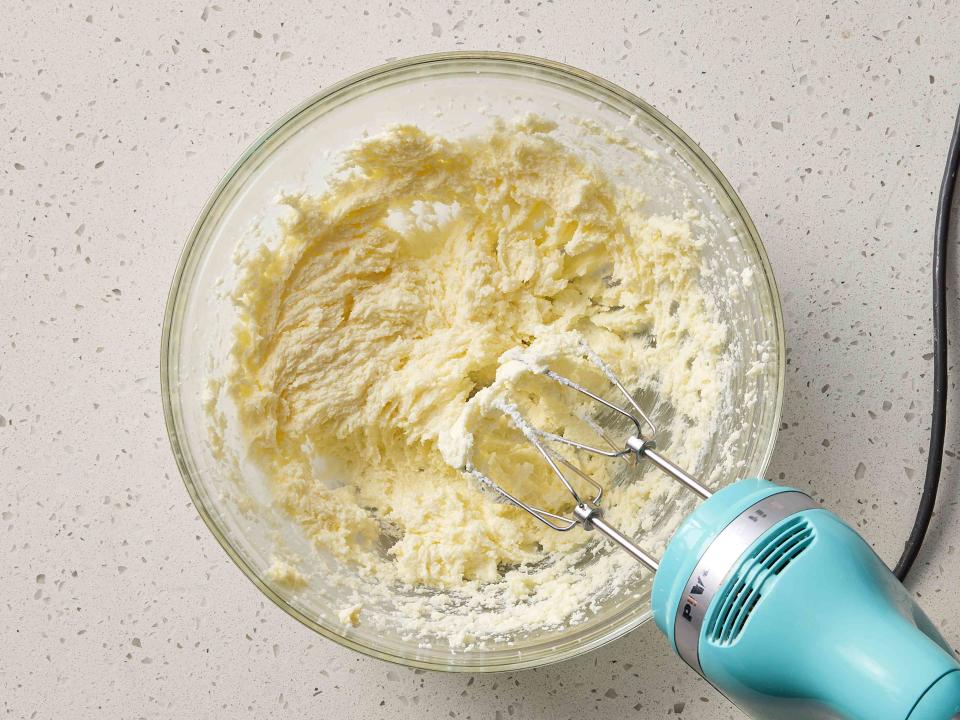
Some recipes will instruct the baker to begin beating the softened butter on its own at moderate speed before adding sugar to the bowl, and others might have the baker start both ingredients in the bowl together; either launching point will lead you to the same destination. Whether you’re using an electric hand mixer fitted with two beaters or a stand mixer fitted with a paddle attachment, the idea is that you will beat the softened butter and sugar together until the two ingredients are well-incorporated, and the resulting mixture is very pale yellow, fluffy, and has taken on volume. This process typically takes anywhere from two to five minutes at a medium-high mixing speed.
While referring to this process as “creaming” is more common in older recipes, modern baking recipes still rely on the technique, just using more widely understood terms (like “mixing”) to explain it.
What Is the Purpose of Creaming Butter and Sugar?
The creamed butter and sugar mixture serves as a foundation on which other ingredients—like your eggs, vanilla, and “dry” ingredients—will build. This foundation is stable yet light, illustrating the two critical functions of creaming: incorporation and aeration.
The first and more obvious purpose of creaming together butter and sugar is thoroughly incorporating these two key components together. The creaming process allows the individual sugar granules to disperse through and dissolve into the softened butter. This stabilized foundation helps to combat separation in your batter or dough as you continue incorporating other ingredients.
The second key purpose of creaming is creating a light and airy foundational matrix for the recipe. During the creaming process, air is whipped into the softened butter, and the butter holds onto that air in tiny pockets, ultimately resulting in a pleasantly-textured baked good. This is especially important in recipes like an old-fashioned pound cake, which traditionally doesn’t call for chemical leavening agents such as baking powder or baking soda. In a recipe like this, properly creaming together your butter and sugar is essential to the structure of the cake. Of course, even in cake recipes that do call for common leaveners, proper creaming will still make the difference between a light, airy crumb and something disappointingly dense.
How to Cream Butter and Sugar
As important a baking technique as creaming is, it’s quite easy to master. You’ll just need to gather a few basic tools and your ingredients.
The Tools You Need:
An Electric Mixer
Because creaming butter and sugar can take up to five minutes, a stand mixer is especially well suited for the task. If you opt for a stand mixer, be sure to use your paddle attachment (also referred to as a “flat beater”) for creaming. However, if you don’t have a stand mixer, or you simply don’t feel like pulling it out, an electric hand mixer matched with a little extra patience will work just as well. For creaming, fit your hand mixer with the standard beaters, not a singular whisk attachment.
A Large Mixing Bowl
If you’re using a stand mixer, you will obviously use the high-sided bowl that fits your mixer. But if you go with a hand mixer, you’ll want to reach for one of your larger mixing bowls to cream butter and sugar. Although ingredients flying shouldn’t really be a concern at this point in the mixing process, typically, you will add all other required ingredients to your creamed butter and sugar (rather than transferring the creamed mixture to a another bowl containing other ingredients), so you need a bowl that can accommodate everything called for in the recipe.
Note
Some mixing bowls are equipped with silicone bottoms (on the outside of the bowl) to prevent it from moving while you’re mixing, but a lightweight stainless steel mixing bowl without this feature will be prone to sliding along the counter during the creaming process. To help stabilize your bowl as you’re creaming the butter and sugar, you can place a dampened kitchen towel underneath the bottom or place the bowl on top of a silicone baking mat.
A Silicone Spatula
During the creaming process, the butter and sugar mixture will naturally be pushed up the sides of your mixing bowl. You will need to pause mixing once or twice to scrape the sides and bottom of the bowl in order to ensure the ingredients are being incorporated evenly. A reliable silicone spatula is the only tool for the job.
The Process

Dotdash Meredith Food Studios
Step One: Soften Your Butter
It can’t be overstated how important softened, or “room temperature,” butter is to properly creaming. The tried and true method for softening butter is simply putting your butter out on the kitchen countertop for about 45 minutes. (Depending on the temperature of your kitchen, the butter may be softened after only 30 minutes, or it could take up to one hour.) That said, if you need butter softened in a hurry, you can always try an Allrecipes-approved shortcut.
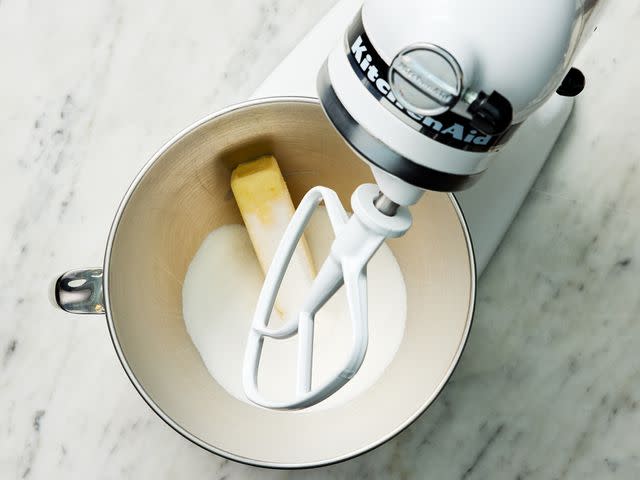
Step Two: Combine the Butter and Sugar
Place however much butter and sugar your recipe calls for into your mixing bowl and begin beating. You can start at a medium speed on the mixer, and make your way up to medium-high over the course of a few seconds.
Step Three: Scrape the Bowl
After about one minute of beating, or just as you see the butter and sugar mixture making its way up the sides of the bowl, stop your mixer and use your spatula to scrape down the sides and along the bottom of the bowl. In other words, give the mixture a good, old-fashioned hand mixing to make sure that there are no unmixed bits hiding out around the bottom edges of the bowl.
Step Four: Continue Beating Until Pale Yellow and Fluffy
As the mixer runs, you’ll witness your butter and sugar homogenize into a delicate paste-like mixture that gradually lightens in color and in texture. Increased volume and softened color indicates that your butter and sugar is thoroughly creamed and you’re ready to add the next ingredients; again, this should take no longer than five minutes. Unless your recipe specifically instructs otherwise, do not beat the butter and sugar for longer than five minutes to avoid over-mixing.

Dotdash Meredith Food Studios
Recipes to Try
Now that you know how to cream butter and sugar like a pro, put the skill to use in one of our favorite cake recipes or a tried-and-true batch of cookies.
Read the original article on All Recipes.

