
'I wore a glucose monitor for a month and realised I'd been underfuelling my training'
We all know that optimal fuelling is vital for exercise performance, especially if you're tackling longer distances like a half marathon, a full marathon or even an ultra. But despite a plethora of energy gels, drinks and chews on the market, it can be overwhelming figuring out exactly how much fuel you need to take – and when you need to take it. Then comes the task of knowing what to eat before and after a training session too.
I've ran a lot of marathons and, even now, fuelling is one of the things I find hardest to nail – particularly as someone whose early twenties were dominated by diet culture, which advocated eating less, rather than more.
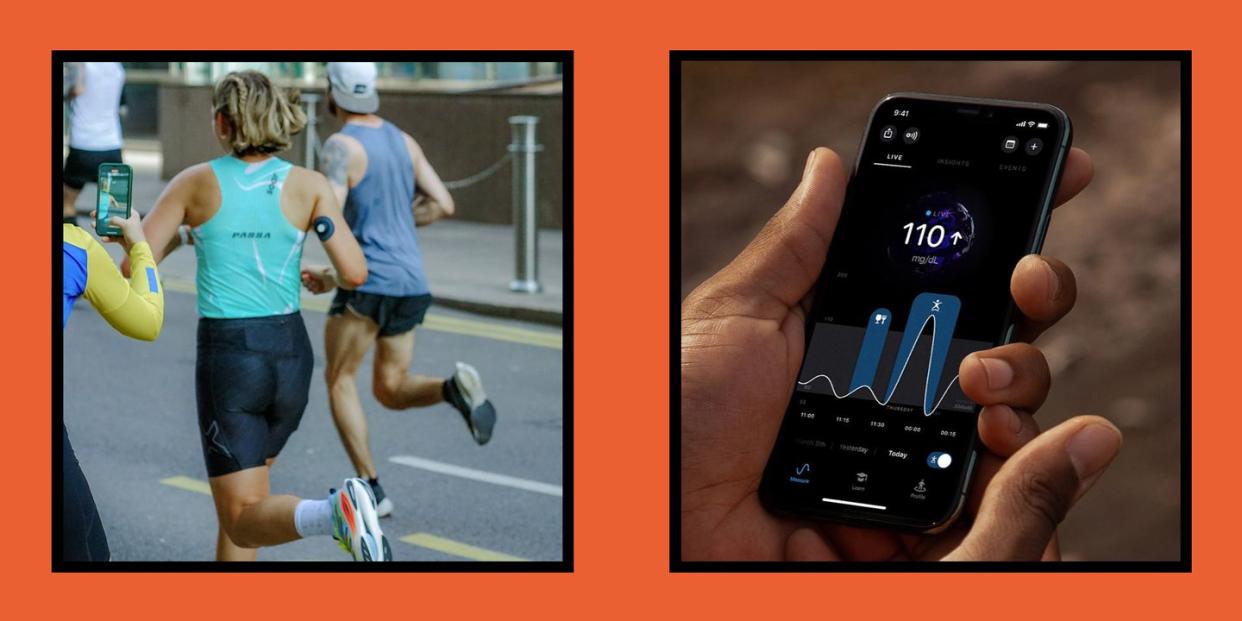
So, in order to attempt to take the guesswork out of training, I wore a continuous glucose monitor (CGM) for a month. Essentially, this is a device that's applied to the back of your forearm and tracks your glucose levels in real time. The idea is that you’re able to see how what you eat is affecting your training and devise an optimal fuelling strategy to maximise your performance.
Just to be clear, I wore the Supersapiens monitor which is specifically designed for sport and isn't intended to be used by diabetics. While it uses the same technology, it has a range limit of 55-200mg/dl (a measure of blood glucose), whereas diabetic CGMs go beyond these limits.
What is glucose and why is it important?
Before we get into things, it's important to understand why glucose is important in the first place.
'Glucose is the currency our body uses for carbohydrates,' explains David Lipman, director of applied science and content at Supersapiens. 'It's stored in the muscles and the liver as glycogen and then we mobilise it to use it as glucose.'
During moderate to intense activity, glucose is the body's preferential fuel, and there's plenty of evidence that taking in carbs during exercise improves endurance.
How does a glucose monitor work?
The Supersapiens monitor is completely painless to apply and, once on, takes about 60 minutes to register. After that, you’ll be able to stream your minute-by-minute glucose data via an app. Each sensor lasts for 14 days before you’ll need to apply a new one (although my first one did come off after eight days, so I’d recommend wearing the over patch that comes with it).
Taking the time to link your glucose data to how you feel and perform is a key part of using the monitor. You’re encouraged to log ‘events’, including meals, workouts and sleep, in order to establish your personal glucose performance zone (GPZ). This is the range of glucose in which you feel and perform at your best, with the aim being to spend as much time as possible in your GPZ when you’re training or competing.
In the first few days of tracking, Lipman advises spending a period of time just observing your usual behaviour and how this impacts your glucose, 'rather than rushing to make changes right away'.
After this, you can ask yourself things like, 'How do we optimise it from there?' he says, and, 'What does my glucose look like on a good day versus a bad day?'.
So, what did I learn after a month of tracking my glucose?
Context is key
One of the first things I noticed wasn’t that my glucose was rapidly spiking and falling after eating – quite the opposite. Working in health and fitness for a number of years, I've been taught to base most of my meals around slow-release carbohydrates (brown bread, oats and wholemeal rice) and a good protein source. This helps to keep blood sugar levels steady, which is important for managing inflammation and promoting a faster recovery.
From a training perspective, however, this has been a hinderance because my glucose hasn't been rising to the levels I need to perform at my best. I've had to learn how to separate 'fuelling for general health' with 'fuelling for endurance sport', eating larger quantities of carbohydrates – including more simple ones – ahead of a run in order to get my glucose levels rising.
I've also been leaving longer between eating and training (2 hours +), as I was finding that my usual window of 1-1.5 hours before wasn't enough time to allow my glucose levels to rise.
Lipman also stresses that 'context is key' when it comes to understanding glucose rushes and falls and that – as I've discovered – while from a recovery perspective they're not so beneficial, they can be really important when it comes to training.
Making every session count
After each workout, Supersapiens encourage you to log your rate of perceived exertion (aka how hard you found the workout) and your energy levels out of 10. This self-reporting is to help you become more aware of how you feel during and after a training session.
I began to notice that I was fuelling my weekend long runs much better than my mid-week training sessions, often feeling strong and energised after these longer miles and weaker during the rest. One of the reasons is because I was doing a lot of my mid-week sessions in a rush before work – often fasted.
After seeing how low my glucose was getting during these sessions, I started introducing a small snack or gel during them to give me a boost of energy. Surprise surprise, I was less exhausted after. I've also swapped my Wednesday track session from the morning to midday to give me more time to fuel for it. Now, I've found I don't start to flag until the final couple of intervals and the session feels stronger overall.
Race day strategy
Monitoring my glucose levels during a race day environment was particularly game changing.
I signed up to a half marathon and followed my usual fuelling strategy: breakfast two hours before, a caffeine gel on the start line, then a gel every 4km. Afterwards, I looked at my glucose chart and was pleased to see that I'd stayed within my GPZ – but I'd experienced a slight dip within the first 15 minutes.

On my next long run, I decided to experiment by bringing my start line gel forwards 20 minutes. This seemed to even out the initial dip. Lipman explains this is called 'rebound hypoglycaemia', whereby you eat and your glucose rapidly goes up, but then a combination of exercise (which uses the glucose) and your body's insulin response brings it back down. Some individuals are more prone to this than others, Lipman says, which is one advantage of being able to track your glucose to spot if it's happening to you (though you'll also get a sense by how you feel during your sessions).
RW verdict
A month of wearing a continuous glucose monitor has definitely taught me a lot about how I've been fuelling – or rather, underfuelling – some of my training sessions. But while I've been able to introduce some changes, a lot of these are low hanging fruits. If you want to figure out how environmental factors and other subtle influences impact your glucose then you’ll need more than 30 days to get to grips with it all. And at that stage, you'll really be getting into the nitty gritty and that '1%' improvement' category.
Not to mention the major caveat: tracking your glucose doesn't come cheap. Two biosensors (enough for one month) will set you back €150/£150. Sure, the device comes with plenty of integrations with third-party wearables and apps (Garmin, Oura, Apple Health, Wahoo etc.) and the minute-by-minute glucose streaming is seriously impressive, but you really need to use it correctly in order to gain value from it.
I'd encourage all runners to experiment with their fuelling strategy – before, during and after training sessions and races. Then, if you still want to get into the nitty gritty (or even nab that podium finish), go ahead and tech-yourself out.
You Might Also Like

