How to Do the T-Bar Row: The Best Landmine Move to Build Your Back
Just because you don't have a huge array of equipment, doesn't mean you need to miss out on making huge training gains. The t-bar row requires just a single barbell, a few plates and a bit of ingenuity, but will open up a whole new set of moves to hit your back, biceps and forearms from a variety of fresh new angles.

So, if you're in the hunt for a thicker, stronger back, then it's time to take the t-bar row seriously. Here, we cover how to do the t-bar row, the muscles worked, the benefits, the variations and we answer your row related FAQs.
Muscles Worked by the T-Bar Row

Latissimus dorsi: The t-bar row predominantly works the lat muscles, those that between the shoulder blades and run from each side of the torso to the lower spine.
Teres major: The teres major is a small muscle that attaches to the scapula and the humerus.
Trapezius: The trap muscles are the large muscles either side of the neck. They contract and pull back and downwards during the t-bar row.
Erector spinae: The erector spinae muscles run either side of the spine. They keep the back and torso stable during the t-bar row.
Rear deltoids: The rear delts are located on the back of the shoulders. During the t-bar row, they contract and pull backwards.
Biceps: While biceps are a secondary mover in the the t-bar row, they assist during flexion of the elbow during the row.
Core: The core muscles located on the trunk keep the torso rigid during the t-bar row.
Glutes: The glutes enable us to hold the hinge position during the t-bar row.

Benefits of the T-Bar Row
Strength Gains
Because of the way the t-bar row is set up, you can shift more weight in comparison to the bent-over row. This accumulation of increased weight will mean you have access to bigger strength gains.
Increased Muscle Mass
The t-bar row primarily targets the muscles of the back, including the lats, rhomboids, traps and rear delts, helping to build a strong and well-rounded back. The set up of the t-bar row means you can work closer to failure more safely and therefore see an increase in muscle mass.
Reduced Strain on Lower Back
Compared to barbell rows, the t-bar row places little less stress on the lower back, making it a safer option for people with back issues.
Versatility
T-bar rows can be modified easily to accommodate different fitness levels and training goals by adjusting the weight and grip position. The equipment is easy to come by in the gym, therefore cutting down on machine queuing time.
Improved Posture
Doing the t-bar row can contribute to better posture by strengthening the entirety of the back.
Is the T-Bar Row Better than the Normal Row?
Choosing the right row variation for you will come down to which muscles you want to work harder and which exercise feels more comfortable for you. Both exercises will work your back muscles, but due to the wider grip of the normal barbell bent over row, it will target the lats slightly more.
On the other hand, the t-bar row requires less work from the hamstrings and core to maintain the hip hinge position and has a slightly smaller range of motion — due to one end of the barbell being fixed. This means you can often pull more weight, hit the upper back more, and take the pressure off the lower back with the t-bar row.
5 Back Workouts for Building Serious Mass
Back and Shoulders Workout for Massive Wings and Bigger Delts
Build a Bigger Back and Supersize Your Arms with Just Two Dumbbells
How Do I Set up T-bar Rows?
The most appealing thing about t-bar rows is that they are easy to set up in a multitude of ways:

A landmine attachment: This is the preferred method despite not always being available. Take a landmine attachment and slot one end of the barbell into it. Load the other end of the barbell with your plates.
The towel in the corner method: Grab a towel and put it in the corner of room, place one end of the barbell in the corner and load the plates on the other end.
The bumper plate method: Use a 10-20kg bumper plate flat on the floor and place the end of the barbell in the bumper plate ring.
The corner of a squat rack method: Place the end of the barbell in the corner of a squat rack and load the plates on the other end.
Note: You can use a towel instead of a close grip attachment to encourage a neutral grip.
How to Do the T-Bar Row

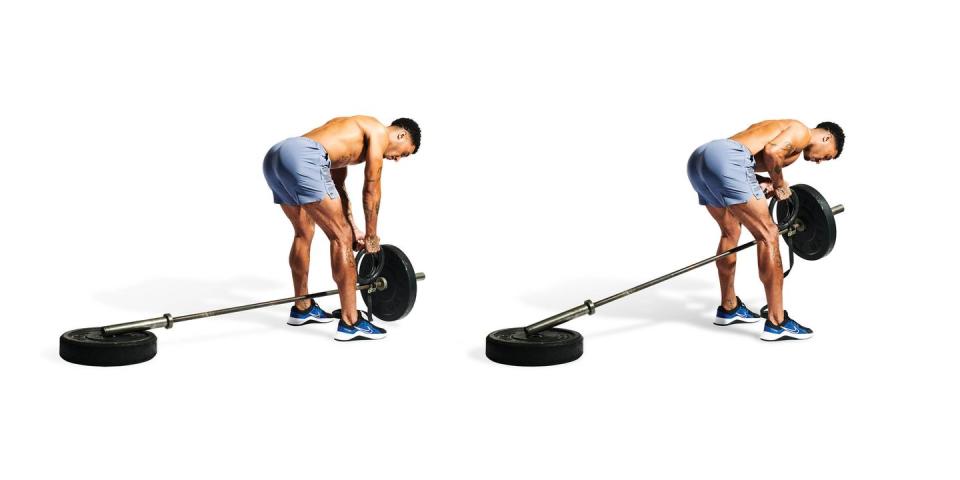
Use a landmine attachment, rest the unloaded end of the bar on a plate or wedge it into a corner to create a sturdy ‘anchor’. Load plates onto the opposite end of the bar.
Use a set of gymnastics rings, straps, a rope or even just a towel, passing it under the barbell, behind the plates to create a set of ‘handles’.
Straddle the bar and hinge at the hips until your torso is near parallel to the ground. Grip your handles, take a deep breath and brace your core. Create tension through your entire body.
Draw your elbows up and back, keeping them close to your body, rowing the weight up as far as possible before the plates make contact with your torso. Squeeze your shoulder blades and pause at the top of each rep before slowly lowering the weight back to the ground under control.
Elevate your feet by standing on plates or blocks to increase the range of motion, alternatively you can use smaller plates on the bar for a similar effect.
T-Bar Row Variations and Alternatives

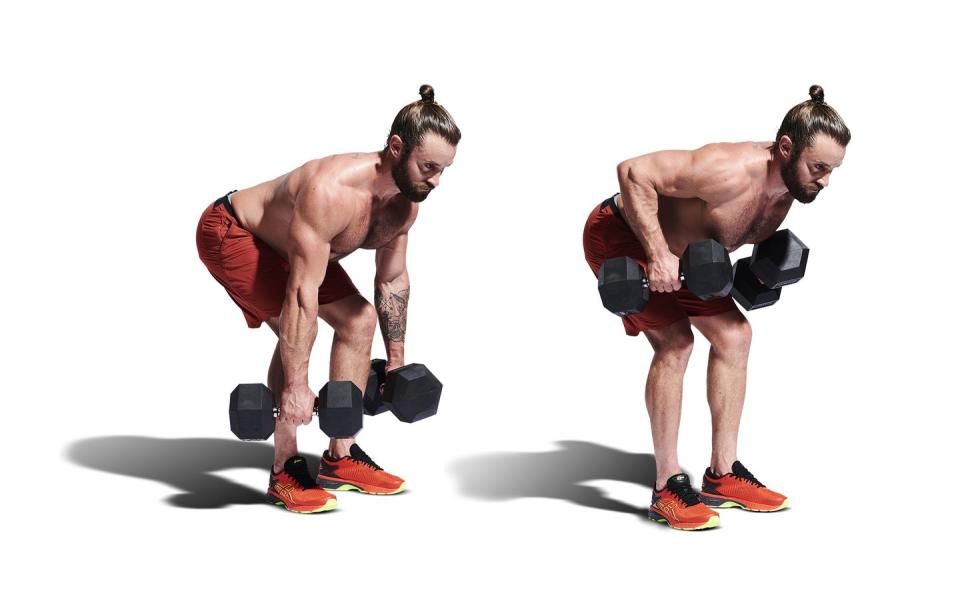
Dumbbell bent-over row
How: Hinge at the hips until your chest is parallel to the floor, dumbbells hanging at your shins. Maintaining a flat back, row both dumbbells towards your torso, squeeze your shoulder blades together and lower under control to the start before repeating.
Why: If you haven't quite mastered the t-bar row and want to get used to the hinge position, the dumbbell bent-over row with some light to moderate weights is a great place to start.

Meadows row
How: Stand sideways at the end of your bar, hinge down with a flat back and grip the bar with one hand. Keeping your core tight and torso as steady as possible, draw your elbow back, behind your body, pulling the bar towards your hips. Pause here, then slowly lower the weight to the floor before repeating.
Why: The meadows row reduces should joint stress and is an efficient exercise to build equal limb strength.

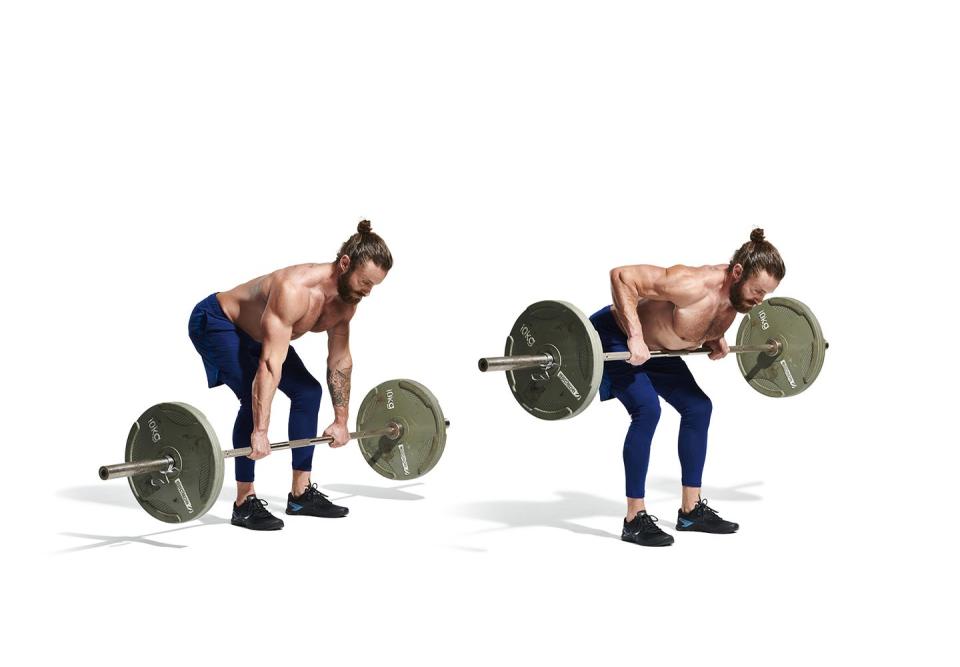
Barbell bent-over row
How: Deadlift your barbell and hinge at the hips until your chest is parallel to the floor, barbell hanging at your shins. Maintaining a flat back, row the bar towards your hips, squeezing your shoulder blades together. Lower under control to the start before repeating.
Why: The barbell bent over row is a staple compound move in many strength programmes. You can use a variety of different grips to hit different areas of your back, with a large emphasis on core and glute strength.

Pendlay row
How: Send the hips behind the heels so your hands reach the bar with a wide grip. Your hips can be slightly higher than your torso with your head in line and a bend in the knees. Pull the bar powerfully towards your hips. Keep the elbows slightly below your shoulders in an arrow shape. Return the weight to the floor, you don't need to control the weight back down.
Why: The Pendlay row is one of the most underutilised exercises for exceptional power and adding mass. Say goodbye to slow and sustained bodybuilding tempo, these reps are to be completed explosively.

Seated cable row
How: Set the cable height in line with your chest. You can be seated on the floor or on a bench. Use the close grip attachment. Sit with your chest lifted, shoulders away from your ears and core engaged. Pull the attachment to the bottom of your ribcage, hold for a beat and then release ready to repeat. Imagine 'holding a pencil between your shoulder blades' with each rep.
Why: The seated cable row is the perfect exercise for all levels. It teaches the correct row movement without stress on the lower back.
You Might Also Like


