
How to get started with pyrography
Interested in pyrography art but not sure exactly what it involves? You've come to the right place. Follow our pyrography guide below and find out more about this craft along with everything you need to get started.
What is pyrography?
Pyrography is the art of decorating wood with burn marks using a heated object like a metal pen.
The term literally means "writing with fire" and comes from the Greek words "pur" and "graphos".
It's believed the age-old art of pyrography dates back to the cavemen, however it can officially be dated back as far as the Han Dynasty (206 BC to 220 AD), where it was known as fire needle embroidery.
Also known as wood burning, pyrography can see some exquisitely beautiful and detailed pieces of art created. If you're a skilled sketcher, it's a great technique to try out on new material, plus it's brilliant for experimenting with wonderfully decorative patterns.
Different tips on pyrography pens and equipment allow you to create a wide variety of brushstrokes for different effects, while different amounts of pressure allows you to achieve different colour tones.
Fancy giving pyrography a go? Keep reading to discover more about pyrography, to get top tips and tricks, and for the best pyrography starter kit to get you going.
Pyrography tools
You will need:
Assorted pyrography tips (around four of five)
Polishing compound like fine sandpaper
You should be able to get everything you need with a good pyrography starter set, which usually includes a pyrography tool, along with step-by-step instructions and accessories to try.
What is the best wood for pyrography?
Pyrography can be a challenging hobby to take on, but one thing that can make all the difference in the results you get is your choice of wood. When choosing the best wood for a pyrography project, especially as a beginner, you should look at:
Colour – Lighter woods work well for pyrography as they give a better contrast to designs.
Grain – The grain in the wood can make a lovely background for a pyrography piece, but it can also make it difficult to work with if the grain is overly raised or coarse. The best wood for pyrography should have a light grain.
Treatment – It's important to only work with untreated wood when using it for pyrography. Since pyrography tools use heat to make marks on the wood, any treatments or chemicals that have been applied to the wood can be harmful to humans and the environment when burned.
Price – If you're just starting out with pyrography, it's best to get to grips with the techniques on cheaper pieces of wood – mistakes are bound to happen, and it'd be a shame to ruin an expensive cut of wood.
Poplar is arguably the best wood for pyrography projects when you are a beginner. It's an inexpensive wood that is easy to get hold of. It has a lovely light colour and almost invisible grain, plus it's a hardwood so if you do make any mistakes on a design, you can use sandpaper to sand it down and burn back over it.
Maple is a lovely wood to work with once you have the basic pyrography skills perfected. It's more expensive than poplar, but has a medium to light colour and a subtle grain that shows great contrast on designs. As it is a slightly harder wood than poplar, we'd recommend using a pyrography tool that can reach high temperatures to ensure an even-coloured burn.
Pyrography tips and tricks:
Monochromatic pictures and designs are best suited to pyrography art, with wildlife, swirling patterns, pets, and geometric prints being popular.
Pyrography projects
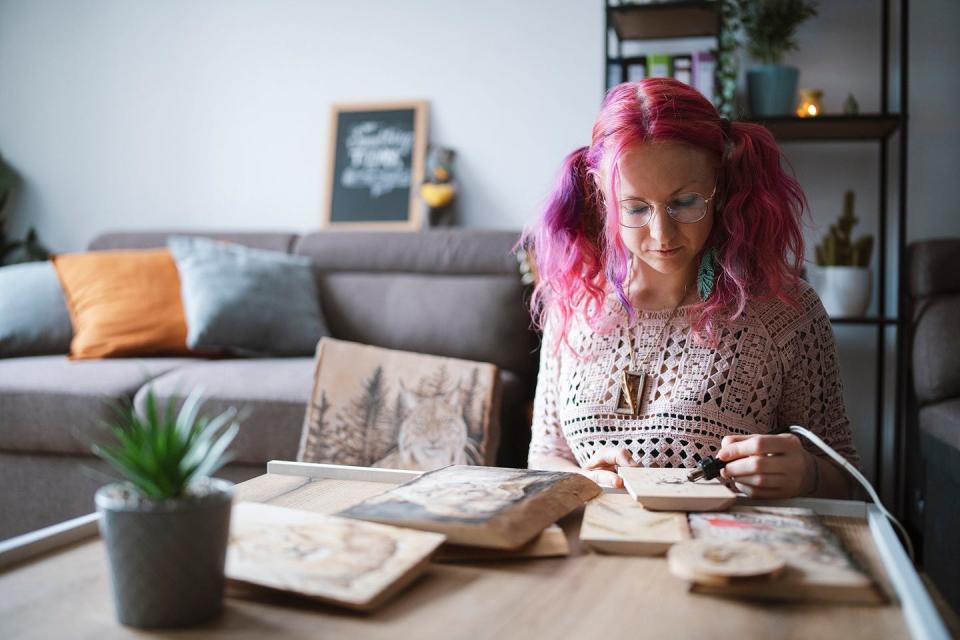
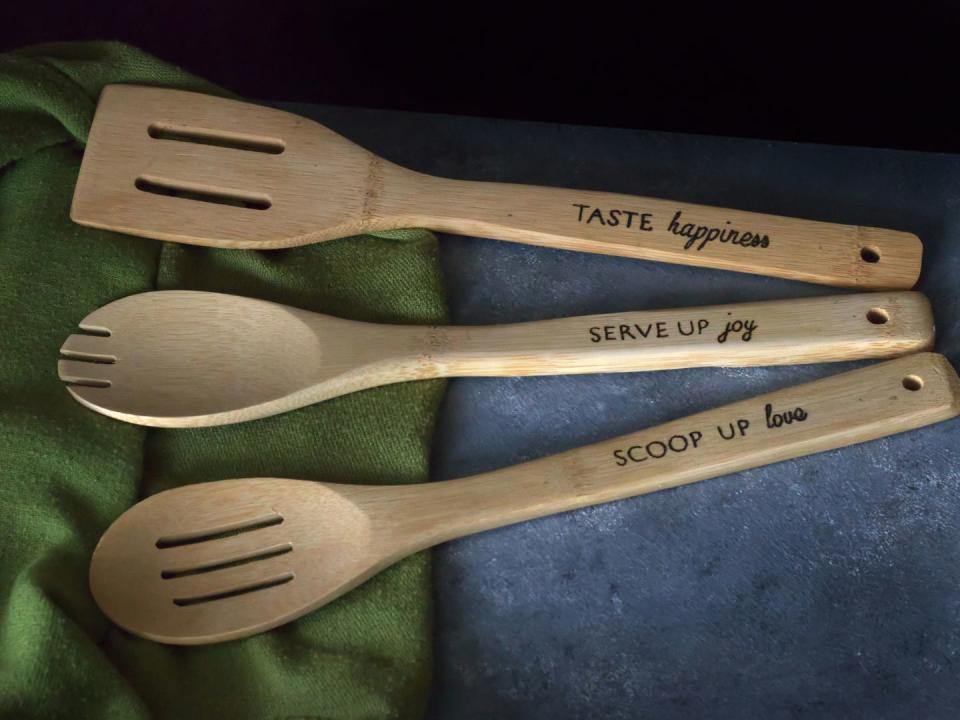
The options for what you can make with pyrography are so varied. From wooden signs for your home to decorative boxes, picture frames and even wooden spoons, once you get going with pyrography, you'll be looking to use this craft to elaborate and personalise so many wooden items. How about a decorative clock or pyrography table mats?
As well as burning designs into your make, you can use pyrography to write a slogan, message or name, making it perfect for making a personalised gift.
Your project doesn't have to end at the pyrography drawing either. You can add colour to your wood design with watercolours, like in the video above, or use acrylic paint for a bolder finish.
While you may want to use pyrography on an item you already have or something you've made, you can also buy some ready to go wood pieces and boxes, known as blanks, that are perfect for pyrography projects. As these often come in multiples, they're great for gifts, a series of makes or if you plan to make something to sell.
Preparing the wood
The wood you choose should be a soft wood, like poplar, ash or maple. They are easier to burn and lighter in colour to give good contrast to your artwork.
You will need to sand down the wood with a good 320-grit sandpaper, going in the direction of the grain. Make sure the surface is clear of dust and clean by wiping it with a damp cloth afterwards.
The smooth surface will make it easier for you to transfer your design and create a clearer finished product.
Transferring your design
You may feel confident enough to draw your idea freehand. But if not, you can transfer your template pattern onto the wood. Graphite or carbon paper is a good way to achieve this. Simply print out the design you would like, place the carbon paper over the wood with the image on top, and trace the outline. Or you can use basic tracing paper.
When it comes to your designs, it's a good idea to turn to social media, like Instagram or Pinterest, for inspiration.
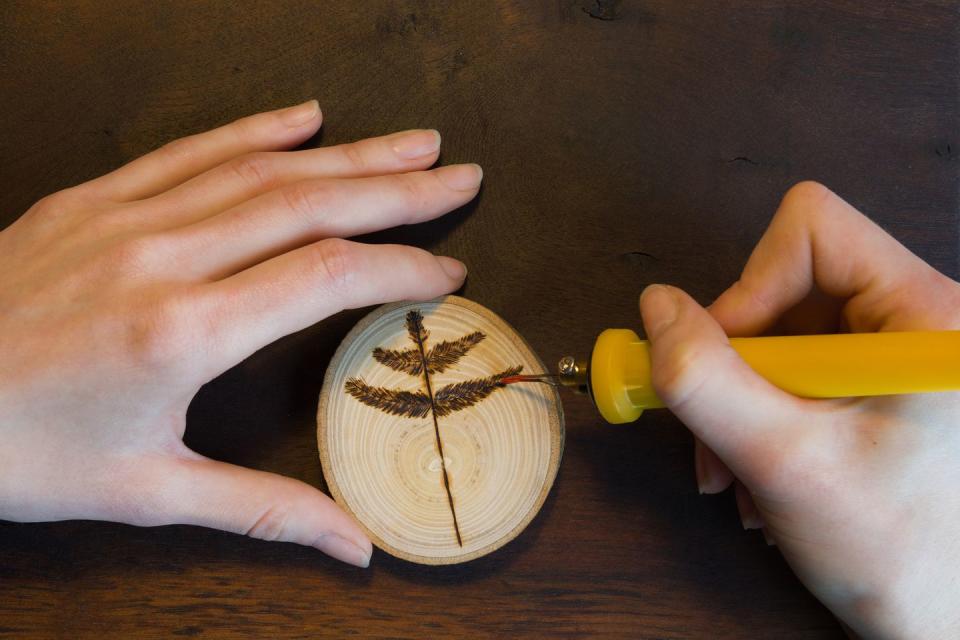
Preparing pyrography tools
You should have a handful of different nibs to work with. Insert the nib you wish to try before turning on your pen, and rest the pen on a holder while it hots up.
It's a good idea to practice on a sample piece of wood before attempting your final design.
Wood burning techniques
1. Use light strokes and don't press too hard with your pyrography tool. Build up layers of colour from light to dark. You can easily make light areas darker but not vice versa. Sometimes you can use sandpaper to correct a mistake but if it's too dark this might not work.
2. Go with the grain when burning, so position it in a way that when you pull the pen towards you it's the right direction to go with the wood. Going against the grain will create resistance and make it harder to do.
3. It's a good idea to create the outline of your picture first and then fill it in.
4. Take time out to clean your tips as carbon build up can affect your pen use. You can use aluminium oxide on your pen when it's cool.
Have you mastered pyrography? Share your creations with us by tagging @primamag in your pictures on Instagram!
You Might Also Like

