
How to organise a shed and bid farewell to the clutter
When you buy through links on our articles, Future and its syndication partners may earn a commission.

Knowing how to organise a shed will increase the productivity and efficiency of your garden – meaning you can spend less time weeding and more time enjoying the beautiful space you've worked so hard to create.
From potting seedlings to hurriedly housing tools when rain threatens, our sheds are in constant use throughout spring and summer. In this hive of activity, your gardening paraphernalia is likely to have got a little disorganised – especially if everything wasn’t in order to start with. After all, garden shed ideas are only as useful as their organisation, so knowing how to organise a shed is essential.
What to do before you organise a shed
Begin organising your shed by emptying everything out of the shed, and laying it on the patio or lawn. Go through your tools, getting rid of anything that is no longer useful, and sharpening and cleaning the items that you intend to keep. Clear out any broken pots, old seed trays, empty packets or out-of-date seeds.
Back inside the shed, sweep away spilt compost, cobwebs and general dust before scrubbing the walls and floors with a brush and bucket of washing-up liquid and warm water. Allow to dry, before getting started on figuring out how to organise a shed.
Once your shed is clean, tidy and organised you'll be able to embrace all your chic shed dreams.
1. Update your shed with paint

If it's been a while since you last thought about how to organise a shed, it might be time for a more thorough refresh.
As well as offering valuable protection and extending the lifespan of even the best shed ideas, painting its interior and exterior also injects added character into your garden.
However, getting the right colour shed paint ideas is essential. ‘Darker shades will disguise a shed, if that is the look you are going for, helping it disappear and drop into the background, while lighter colours will lift and brighten an enclosed garden,’ says Becky Rackstraw, director at wood-stain specialist Protek.

Protek Royal Exterior Finish in Warm Clay
Tthe green undertones of Protek’s Priddy Pools, perfectly complement the deeper greens of foliage for a harmonious exterior, while an interior in Warm Clay will foster a light but cosy atmosphere. A potting table, painted in Iris Blue creates a bold statement and will tie everything together.
2. Store tools on the wall
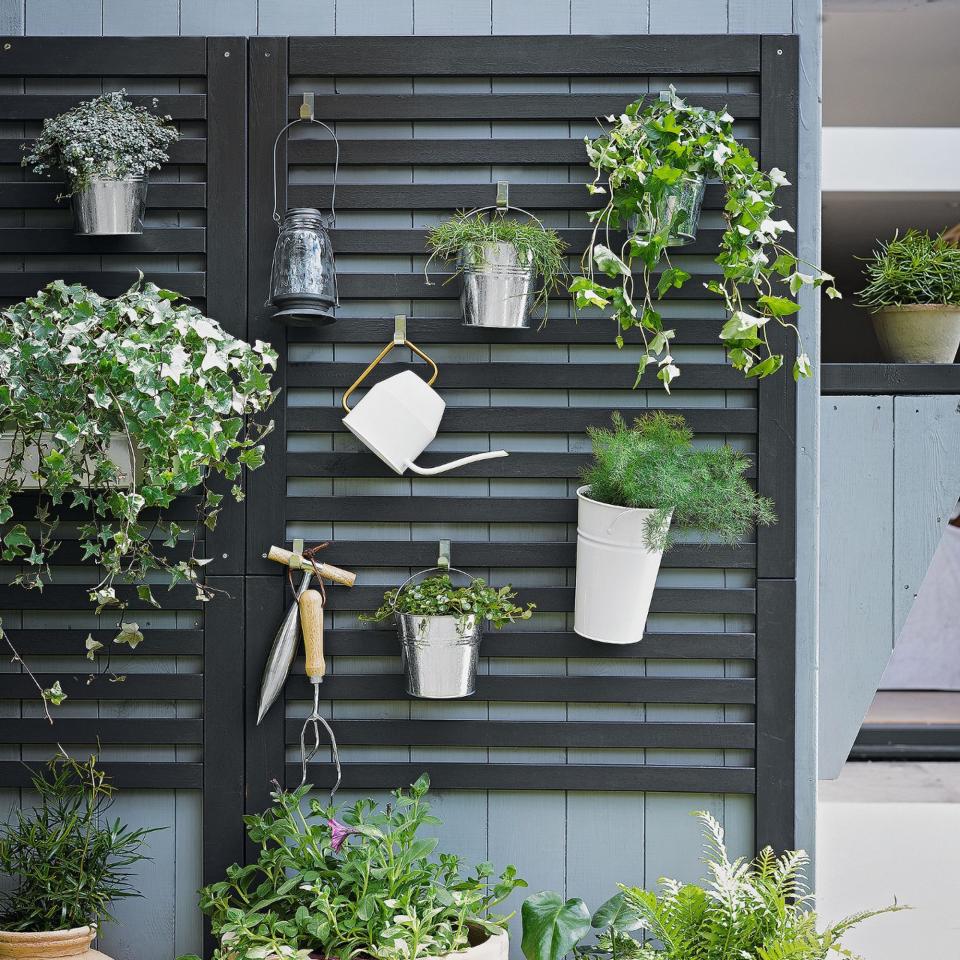
Clear floor space in the shed by opting for wall-hanging garden tool storage ideas. As well as increasing your available square footage it'll be so much easier to know what you have before you start a project, and to be able to quickly find something qhen required.
Moving your tools to the wall will also free up space for larger equipment such as even a lawn mower or strimmer.

Burgon & Ball Garden Tool Rack
This rack features five adjustable clips, that can each hold up to 3kg. To hang tools, simply push the handle into place – it’s safer than leaving them propped up against the wall. You can add more lengths of rack to house your whole tool collection.
3. Add a potting table

The secret to maintaining a tidy space is ensuring everything has a home. Small garden ideas require small sheds, and a potting shed can help make the most of the available footprint.
You ideally want one with drawers to keep all your bits and bobs in one place, like spare nails, string and scissors. If yours comes with shelves instead then a few baskets will do the job just as well.
Make sure you choose the right height of a table too. If you need to sit while working at the bench, you'll need to bear this in mind when choosing one.

Moreton Potting Bench
This potting bench has two drawers and a generous lower shelf which can be used for baskets or storing larger items. Making use of every inch, it also features two fixed hooks on the right and a rail with four S-hooks on the left, meaning that your essentials are easily accessible.
4. Install open shelves
Stacks of pots left on the shed floor are a trip hazard, plus they tend to make the space look cluttered. Store them on deep, open shelves instead.
When installing your shelves, screw them into the thicker wooden battens in the shed’s construction rather than directly into the thinner wall – this is less able to hold the weight. Save on resources by using any leftover wood for the shelves, although B&Q sell similar wooden shelf brackets.
5. Create pallet storage for free

Reclaimed and salvaged items can create perfect shed storage. Pallet ideas for gardens are an excellent way to save money.
With a simple bit of DIY, these old pallets have been reimagined as deep storage boxes, ideal for stowing pots or storing vegetables, together with a solid worktop. The benefit of designing your own storage is that you can create it to fit your needs, often at negligible cost.
If you don’t have any pallets, check your local buy/sell pages or ask at local shops, construction sites or garden centres for any unwanted ones.
6. Install a green roof

Increase the sustainability of your shed by topping it with a green roof. ‘More than just a fad or decorative novelty, a living green roof provides insulation, helps filter pollutants from the air, absorbs noise and provides food and shelter for wildlife,’ says Simon Marsh of garden specialist Harrowden. The layers will also provide insulation, helping keep a shed warm, too.
For a small shed, you can try a DIY living roof, such as the Sedum Pitched Roof Kit from Harrowden, as it will be more affordable than professional installation – for more information learn how much a green roof costs.
Harrowden's eco-friendly matting is planted with hardy drought-tolerant sedums, such as white stonecrop, angelina, meadow saxifrage and gold sedum, which create a low-maintenance green roof that will be a valuable addition to your wildlife garden ideas.
7. Get organised with a planting seed calendar

Time is of the essence in the garden, so ensure you don’t miss important sowing dates with this pretty wall display for your shed.
For an easy craft project, glue two strips of hessian fabric onto a backing board to create two rows of six pockets, labelling each one with a month. Slot your seed packets or plant labels into the relevant pocket as a visual reminder for the year ahead.
8. Create space for string

Sometimes small additions can make a huge difference when it comes to figuring out how to organise a shed. Prevent balls of string from becoming a tangled mess by creating a wall dispenser.
Use superglue to attach the handle of a metal funnel to the shed wall, then place your string inside and run it through the spout. This way, you can always find the end when needed. For similar funnels, try Sainsbury’s Home.
9. Create a nook

Learning how to organise a shed isn't just about functional shelves. Elevate your humble shed from a practical storage space, and dress it up with pretty additions to create an inviting nook. Make bunting from decorative empty seed packets – not only is it an attractive touch but it can also be used to help keep track of what you’ve planted.
Make a chalkboard – ideal for planning your garden jobs for the month – by painting a wooden chopping board with chalk paint. Finish off by displaying pictures of flowers, or even swatches of floral wallpaper, and bring in a cosy chair for a welcome spot to rest after a busy day in the garden.
10. Incorporate a lean-to and increase growing

Whether your shed includes integrated greenhouse ideas or you have a potting bench below a window, knowing how to organise a shed means you can also create a space where you can nurture seedlings and overwinter vulnerable plants. This can help maximise your growing efforts.
For the best chance of success, opt for a bench with slats to foster good air circulation.
11. Use your shed to dry flowers

Once you've learnt how to organise a shed, you can use it for more than just storage. Sheds are often cool, dark places, creating the ideal environment for drying herbs or cut flowers. Learning how to preserve flowers is actually very straightforward – drying hydrangeas is one of our favourites.
Pick your stems at the start of the day – once the morning dew has dried – then remove any excess foliage from the stem and under the flower heads. Use string to tie into groups of around six stems and hang upside down on a rail or, if you have the space, from a suspended herb drier. Depending on the plant, it takes around three weeks to dry out and they will last between nine months to a year.
FAQs
How do I organise my shed?
When figuring out how to organise a shed, the first step is to empty everything out and get rid of anything that is no longer useful – it is much easier to organise when you're not hoarding clutter.
Once you've figured out the essentials, decide on storage solutions to suit your needs. For example, if you have lots of pots, then a dedicated shelf or drawers will prove useful, while if you are trying to prop up lots of long-handled tools, a wall-hanging rack might be a worthwhile investment.
How to organise a small shed?
When it comes to how to organise a small shed, the secret is to get as much as possible off the floor. Look for shelves for pots and wall racks for tools. Also, ensure that any tables or similar have space for storage underneath.

