
How to knit a chunky waterfall cardigan

Looking for a free knitted cardigan pattern that's perfect for adding a layer on chilly evenings - we've got just the thing!
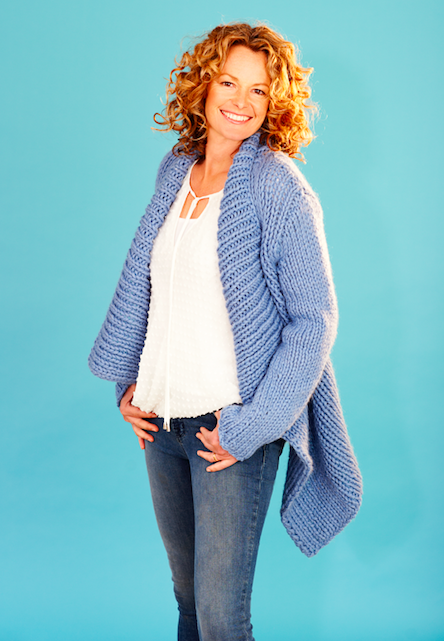
Knitwear Designer Erika Knight created this exclusive knitted cardigan pattern for Prima – and it soon won a number of fans, including TV Presenter Kate Humble. Cosy, comfy and snuggy, this is the kind of easy knit everyone needs in their winter wardrobe.
Waterfall cardigans are button-less and are a garment you simply throw on, especially if you're in a rush and just want to get something over your arms. The design is longer at the back which gives it a flattering shape. If you're looking for an easy winter wardrobe essential that you'll gets a lot of wear out of, this is the cardigan for you.
The knitting pattern isn't too tricky to follow and makes for a suitable project for intermediate and advanced knitters.
And, once you've finished knitting your cardigan, you can throw it over dresses and tops until the weather warms up.
SIZE/MEASUREMENTS
One size to fit up to 97cm bust; finished measurements: 47cm across back at arm hole; length to centre back neck approximately 53cm; sleeve seam 50cm.
MATERIALS
This project was knitted with nine 100g hanks of Erika Knight maxi wool in shade Steve 32. This is a chunky wool with a loose pile. An alternative to this yarn you could try is Rowan Big Wool which is more readily available in a range of colours. This yarn is slightly softer and is piled but will give the same gauze and the same cosy fit.
Pair of 12mm knitting needles
Steam iron
TENSION
8 sts and 12 rows to 10cm square over st-st using 12mm needles.
ABBREVIATIONS
beg beginning; cont continue; dec decrease; foll following; inc increase; k knit; m1 make one st by picking up and working into back of loop lying between st just worked and next st; p purl; rem remain(ing); RS right side; st(s) stitch(es); st-st stocking stitch; tbl through back loop; tog together; WS wrong side
NOTES
Join in all your new balls of yarn at side seam edges
BACK
With 12mm needles, cast on 11 sts.
Beg with a k row, work 2 rows in st-st.
Next (inc) row (RS) K3, m1, k to the last 3 sts, m1, k3.
Work 2 rows in st-st.
Next (inc) row (WS)P3,m1,p to the last3 sts, m1, p3.
Work 2 rows in st-st.Rep the last 6 rows 5 times more then the 1st of these 6 rows again, so ending with a RS inc row. 37 sts.
P 1 row and place a marker at each end of the row.
Shape armhole
1st (dec) row (RS) K3, k2tog, k to last 5 sts, k2tog tbl, k3.
2nd (dec) row P3, p2tog tbl, p to last 5 sts, p2tog, p3.
3rd (dec) row As 1st row. 31 sts.
Cont straight until armhole measures 20cm, ending with RS facing for next row.
Shape shoulders and back neck
Next row K12, turn and cont on these sts only, leave rem sts on a spare needle.
Next row Cast off 3 sts, p to end.
Cast off rem 9 sts.
With RS facing, rejoin yarn to rem 19 sts, cast off centre 7 sts and place a marker on the centre st, k to end.
Next row P to end.
Next row Cast off 3 sts, k to end.
Cast off rem 9 sts.
LEFT FRONT
With 12mm needles, cast on 70 sts.
Rib row [K1, p1] to end.
This row forms rib and is repeated.Rib 1 row.
Next (dec) row (RS) Rib 3, p2tog, rib to end.
Work 2 rows in rib as set.
Next (dec) row (WS) Rib as set to last 5 sts, k2tog, rib 3.
Cont to dec 1 st on the same edge on every foll 3rd row until 57 sts rem.
Work 1 row straight, ending at side edge.Place a marker at end of the last row.
Shape armhole
1st (dec) row Rib 3, p2tog, rib to end.
2nd (dec) row Rib as set to last 5 sts, k2tog, rib 3.
3rd (dec) row As 1st dec row. 54 sts. Cont straight until armhole matches back to start of shoulder shaping, ending at armhole edge.
Shape shoulder
Next row Cast off 9 sts in rib, rib to end of row.
Shape collar
Next row Rib to end of row, cast on 10 sts. Work straight in rib until collar measures 13cm. Cast off in rib.
RIGHT FRONT
With 12mm needles, cast on 70 sts.
Rib row [P1, k1] to end.
This row forms rib and is repeated. Rib 1 row.
Next (dec) row (RS) Rib to last 5 sts, p2tog, rib 3.
Work 2 rows in rib as set.
Next (dec) row (WS) Rib 3, k2tog, rib as set to end of row.
Cont to dec 1 st on the same edge on every foll 3rd row until 57 sts rem.
Work 2 rows straight, ending at side edge.
Place a marker at end of the last row.
Shape armhole
1st (dec) row rib 3, K2tog, rib to end.
2nd (dec) row rib as set to last 5 sts, P2tog, rib 3.
3rd (dec) row As 1st dec row. 54 sts. Cont straight until armhole matches back to start of shoulder shaping, ending at armhole edge.
Shape shoulder
Next row (WS) Cast off 9 sts in rib, rib to end of row.
Shape collar
Next row Rib to end of row, cast on10 sts. Work straight in rib until collar measures 13cm. Cast off in rib.
SLEEVES
With 12mm needles, cast on 21 sts.
Beg with a k row, work 14 rows in st-st.
Next (inc) row (RS) K3, m1, k to the last 3sts, m1, k3.
Work 9 rows.
Rep the last 10 rows twice more, then the inc row once more. 29 sts.
Cont straight until sleeve measures 50cm from cast on edge, ending with RS facing for next row.
Place a marker at each end of last row.
Shape top
Dec 1 st at each end of next 3 rows, then on foll RS row. 21 sts.
P 1 row. Cast off 2sts at beg of next 6 rows. 9sts.
Cast off rem sts.
TO MAKE UP YOUR WATERFALL CARDIGAN
Weave in any long ends. Lay work out flat and gently steam on WS. Join both shoulder seams. Join row-ends of collar pieces to form back seam, then sew cast on collar edge to back neck edge, easing to fit and with collar seam to back neck marker.
With centre of cast off edge of sleeve to shoulder, sew sleeves into armholes between markers. Join side and sleeve seams.
You Might Also Like
