
The £42 mirror hack and more great ideas for leftover tiles
Clever ways to get creative with tiles
@our_home_style_ / Instagram
Do you have spare tiles left over from a room update? Or, perhaps there's a sample or two gathering dust in the cupboard? Don't throw them out, it's time to put them to good use!
This mirror hack using a budget-friendly IKEA hero product has gone viral for good reason. Find out how to recreate it and more ways to use up any leftover tiles in 25 creative home projects, from trays and wall art to plant pots and clever furniture upcycles.
Create a statement mirror
@our_home_style_ / Instagram
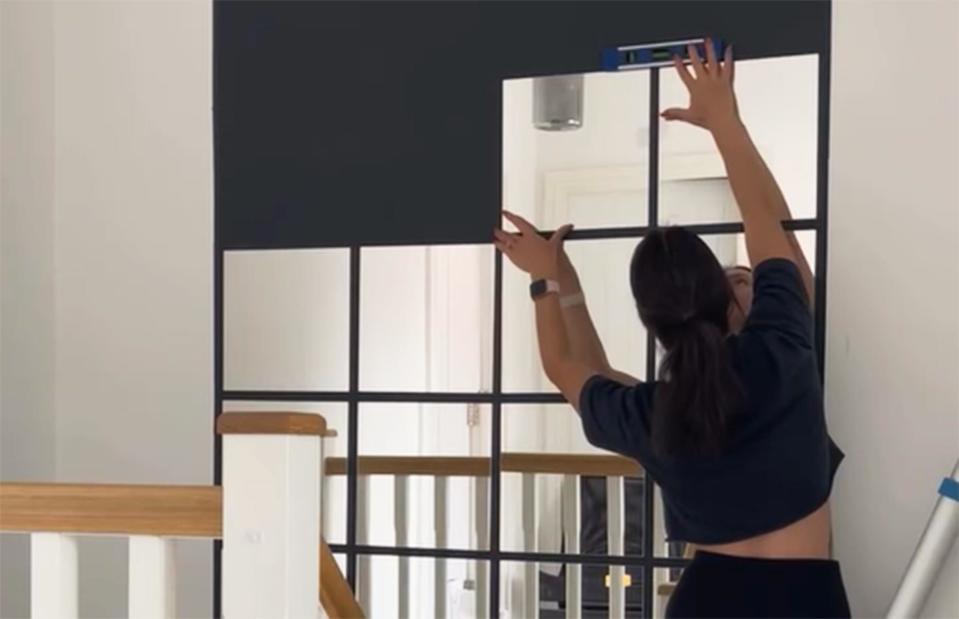
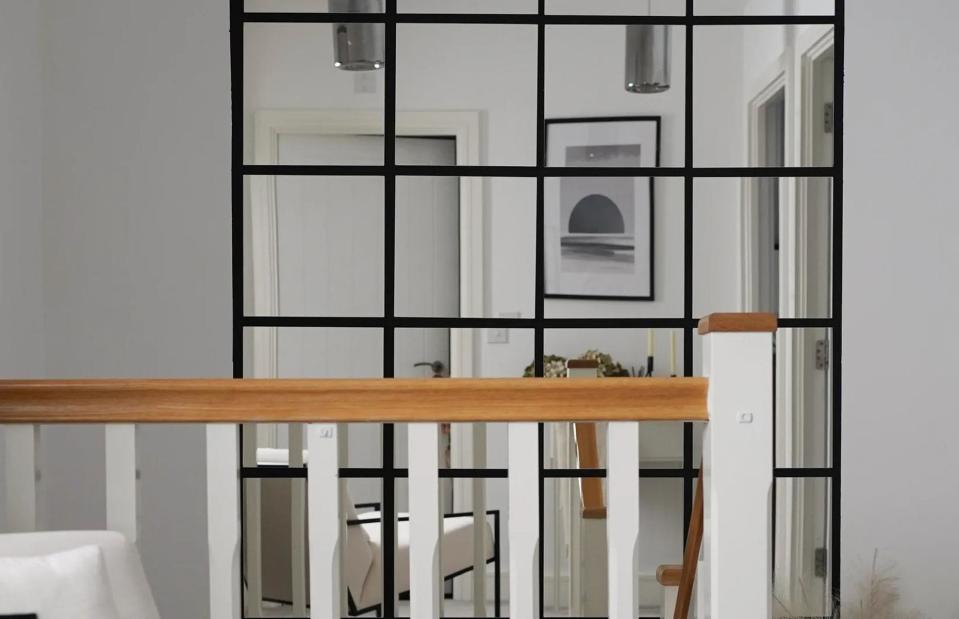
If you have mirror tiles left over why not try this viral oversized mirror project? This budget-friendly idea comes in at just £42 ($52) and is made with black paint and IKEA's stick-on mirror tiles. Begin by painting a large black rectangle on the wall. Aim for 130cm x 194cm to leave a clean 2cm gap around the mirror tiles. Use a spirit level to ensure straight lines for a polished look.
After the paint dries, it's time to add the mirror tiles. Starting at the top, measure 2cm from the edge of the black rectangle using a ruler or tape measure. Stick your first mirror tile there, and continue adding tiles row by row, following the 2cm gap all around. Anna from @our_home_style_ has a video of the project to follow.
Use mirror mosaics on a disco ball planter
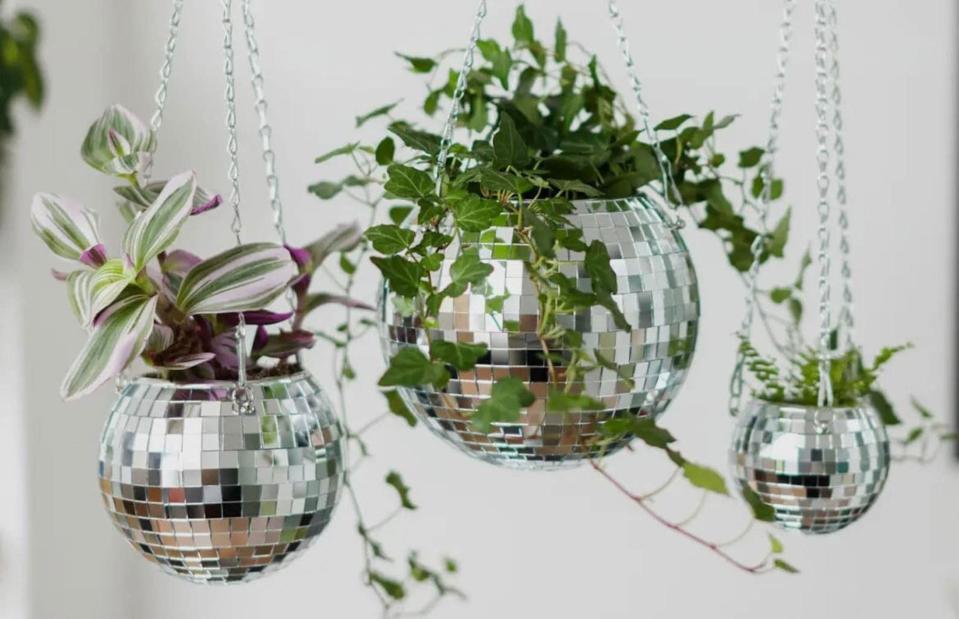
WildestDreamsflowers / Etsy
We are in love with these cute hanging planters by WildestDreamsflowers on Etsy. They make a great alternative use of a disco ball! These have been popular lately, but it's far more fun to create your own.
Audrey Oscura shows you how on her Instructables page using mirror tiles. The finished disco ball will throw light around your garden terrace turning it into an alfresco dance floor.
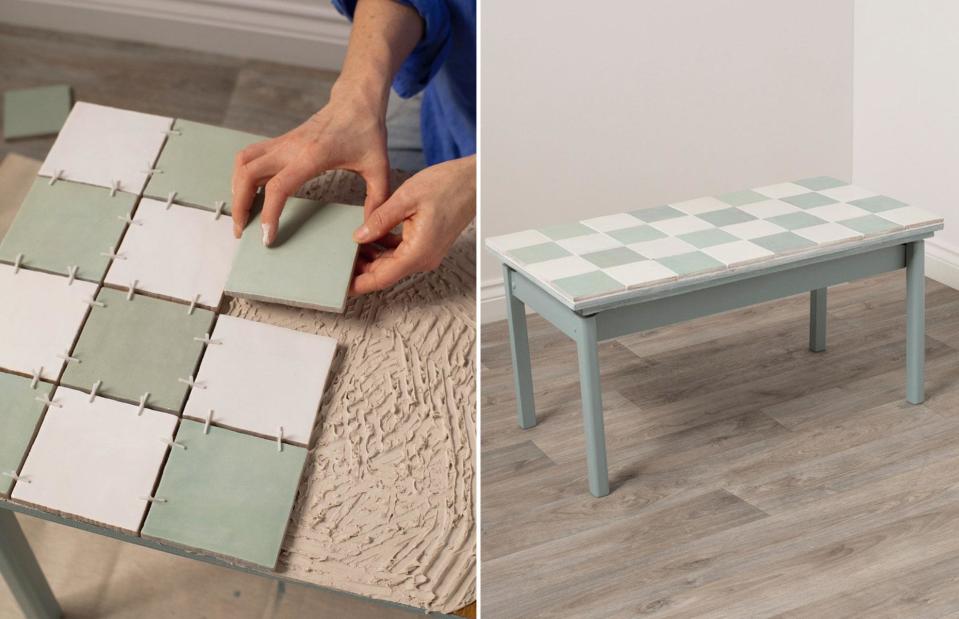
Tile a preloved coffee table
eBay Home & Garden
According to eBay UK households discard around a million tonnes of furniture a year. So before you purchase a brand new coffee table, why not customise a piece of preloved furniture instead?
First, prep the surface with a light sanding to ensure a good bond. Then, spread tile adhesive with a notched trowel for even application. Carefully lay your chosen tiles, using spacers for consistent gaps, and let the glue dry completely. Fill the gaps between the tiles with grout, leave for a few minutes to cure slightly and then remove excess with a damp sponge. Sand, clean and paint the legs with furniture paint to match your design. Finally, apply a clear finishing wax to the painted legs for extra protection and shine, buffing it to a polished finish. With a little effort, your once-tired table will be reborn as a stunning centrepiece!
Save marble tiles for a side table
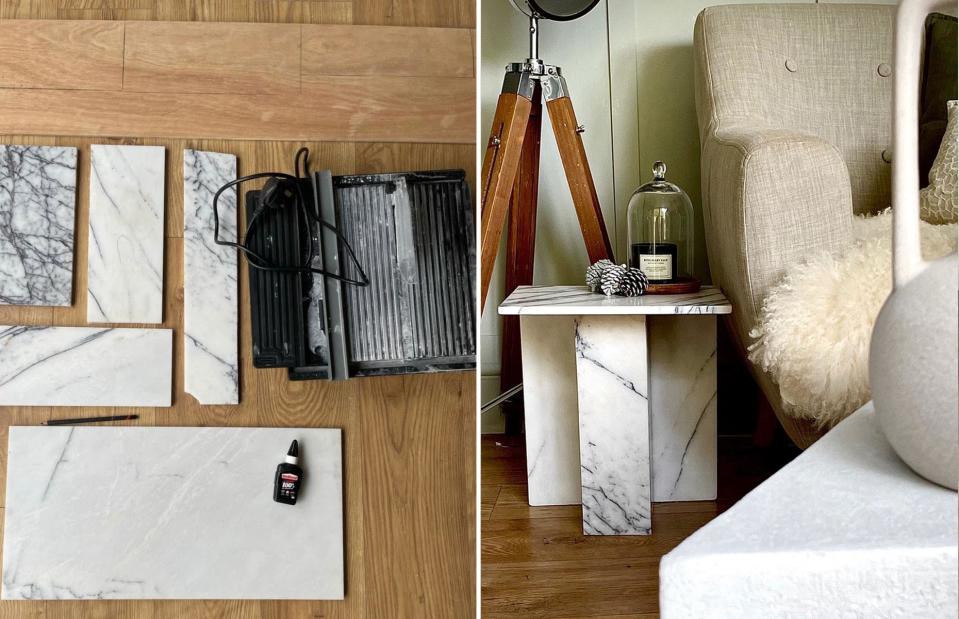
Claire Douglas Styling
Marble tiles are too good to waste and the offcuts can be used in a variety of ways, including this ingenious and chic side table. First, you need to prepare all the pieces. Measure and cut the tiles and wood using a special electric cutter for the tiles, smoothing the edges with a file for a clean finish. Then, build a sturdy wooden base using plywood, screws and glue.
Once the base is dry, glue the tiles onto the base one by one. Make sure to use strong glue and clamps to hold them in place. Finally, attach the back tile and the tabletop tile using glue as well. Let everything dry completely before using the table. A top tip when using marble tiles is to protect with sealant to prevent staining. Follow the full tutorial and check out other tile DIYs at Claire Douglas Styling.
Make modern plant stands
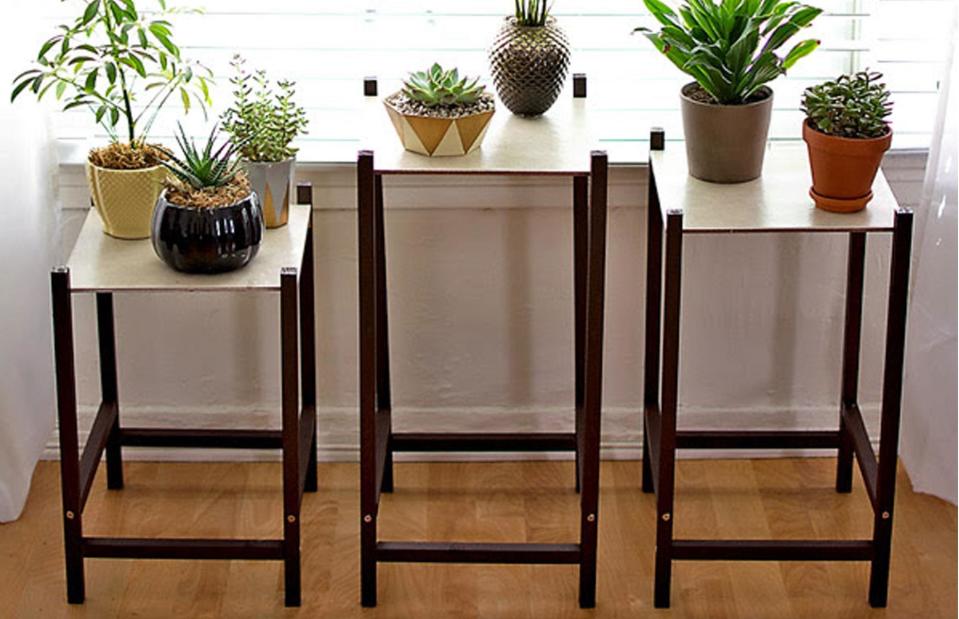
Homey Oh My
A house can never have too many plants, that's why we love these DIY contemporary plant stands made from large-format ceramic tiles and 24-inch wooden batons. To build the stands, first drill a hole 1.5 inches from the base on each pair of legs. Then, connect the leg pairs with a screw at another hole drilled 1 inch higher. Make sure the distance between these holes is exactly the width of your tile minus the width of two legs.
Next, drill holes for the corner braces near the top of the legs connected by the longer wood pieces. Put glue on the braces and place the tile on top. Let the glue dry completely before using the table. Check out the full instructions on the interior design and lifestyle blog, Home Oh My, who recommends staining the piece after it is assembled.
Tile a bath panel
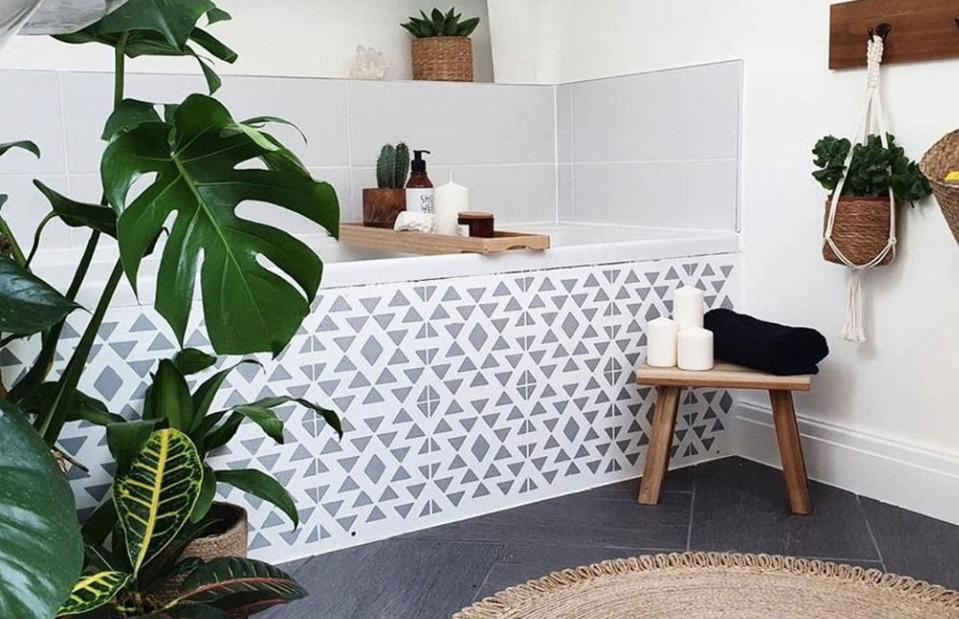
@athomewithesther / Instagram / Dizzy Duck Designs
If you have plain white tiles left over from a project you could use them to turn a bath panel into a practical but decorative feature. These have been stencilled by @athomewithesther with an Aztec-inspired design. To recreate the look, clean the bath panel thoroughly with sugar soap and let it dry completely. Keep it simple by choosing a stencil that fits perfectly over the tile and secure it with tape. Use a foam roller to apply the colour; you can use tile paint or even chalk paint but check the tin or do a test piece first.
Apply the paint with a light, even coat, rolling from left to right. Avoid going over the same area too many times to prevent bleeding. Once finished, carefully remove the stencil and let the paint dry completely. Protect it with 2-3 coats of water-based clear urethane sealant, applied with a dense foam roller to prevent wear and make it waterproof.
Lay and display
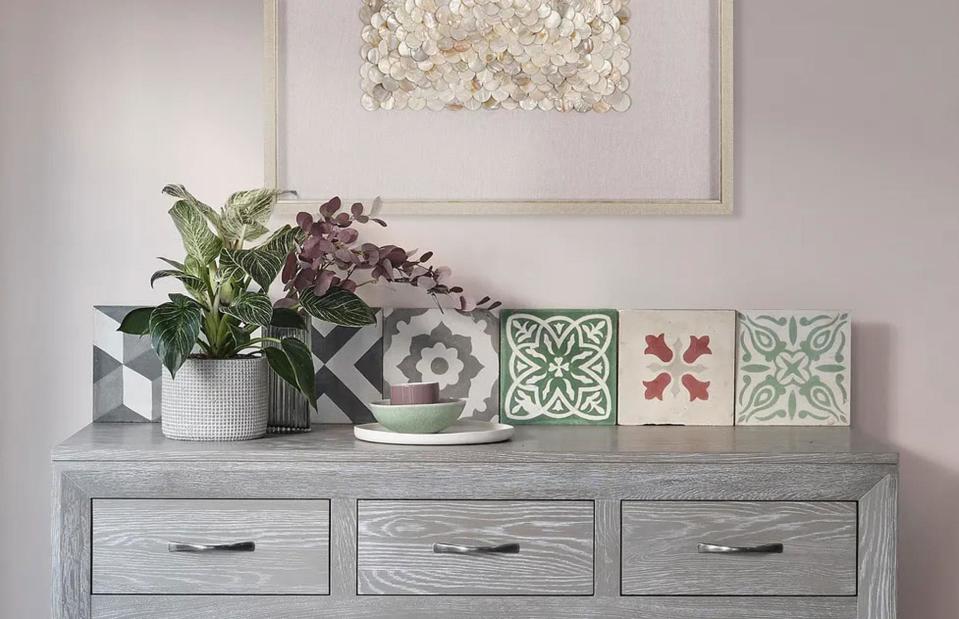
Oak Furniture Land
Those gorgeous leftover tiles deserve better than a dusty box! Why not brighten up a sideboard or hallway table by displaying them in a row? This colour-coordinated display is simply leaning against a wall for a relaxed and rustic look. Instead of a standard row, arrange them in a playful pattern maybe alternating black and white or colour graduations.
You can even glue them to boards to create wall art or an instant splashback. Try geometric patterns, create chevrons or just mix and match textures by mixing smooth and patterned tiles.
Embellish bedroom walls
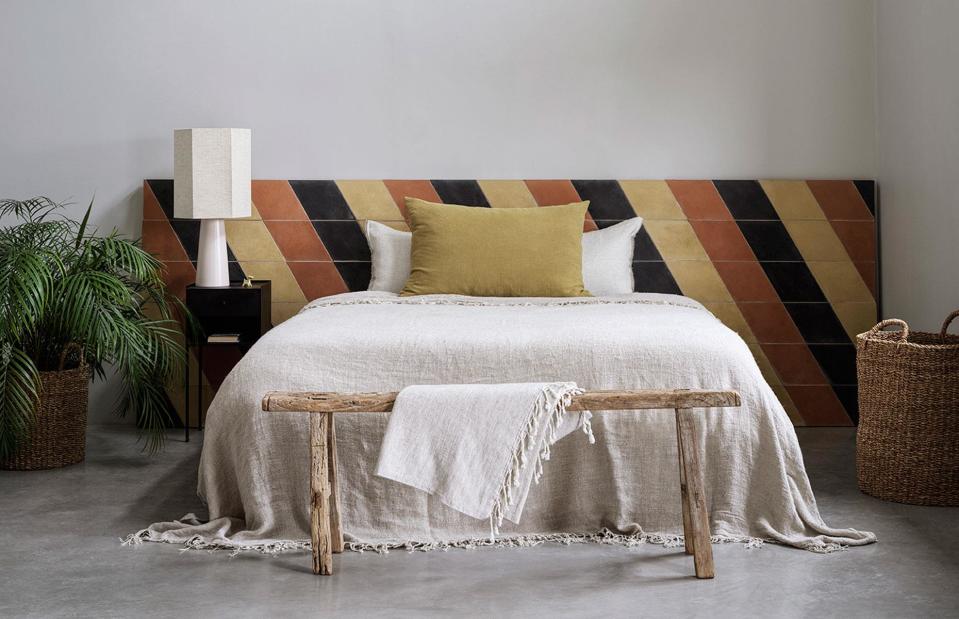
Hyperion Tiles / Bert & May
Move over wall panel ideas, why not use leftover tiles behind your bed to create a striking headboard? What a creative way to inject a touch of colour and depth into your bedroom.
For a renter-friendly alternative, measure out and cut a sheet of MDF to use as a headboard base. This will act as a portable backdrop for your tiles to be laid and grouted onto, resulting in damage-free walls.
Make a quick kitchen tray
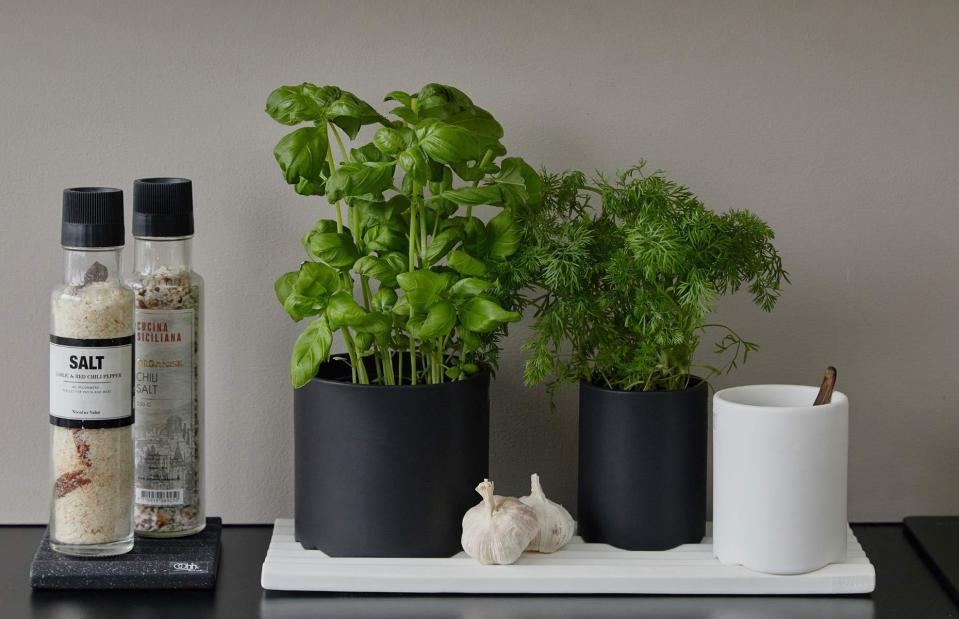
Pangaea Home
Tired of salt and pepper shakers leaving rings on your countertop? Repurpose those leftover tiles to create stylish and practical kitchen trays. Simply clean the tile and seal it with a water-based clear urethane sealant (you can also add some cork backing to prevent slipping), and voila – a stylish grinder station! You can also reuse a bigger tile to create a cool display. Arrange your favourite potted herbs and condiments on the tray, keeping them corralled and preventing spills. This easy upcycle project protects your worktops while adding a touch of personality to your kitchen.
Frame a decorative tile
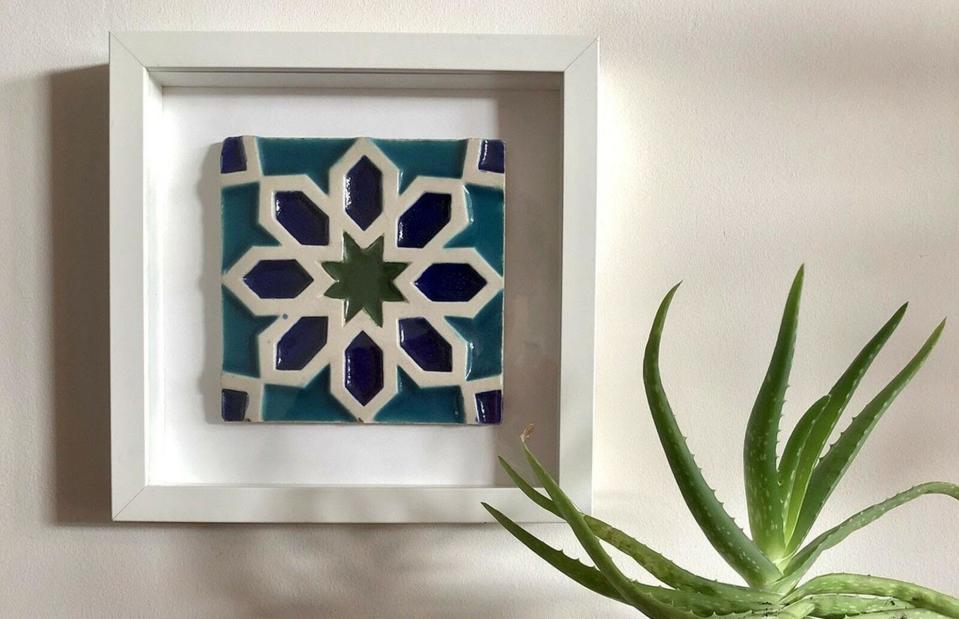
Fiach / PaisleyHoneyCo / Etsy
Statement wall tiles look beautiful on interior walls, especially when mounted in frames for a more homely finish.
This blue tile has been transformed into a pretty piece of textured wall art and comes framed from Etsy, should you wish to buy one ready-made. But, a DIY version could be easily achieved by mounting leftover tiles in a white box frame. Make sure to use a strong glue and measure it up to get it square in the centre of the frame.
Highlight a kitchen mantel
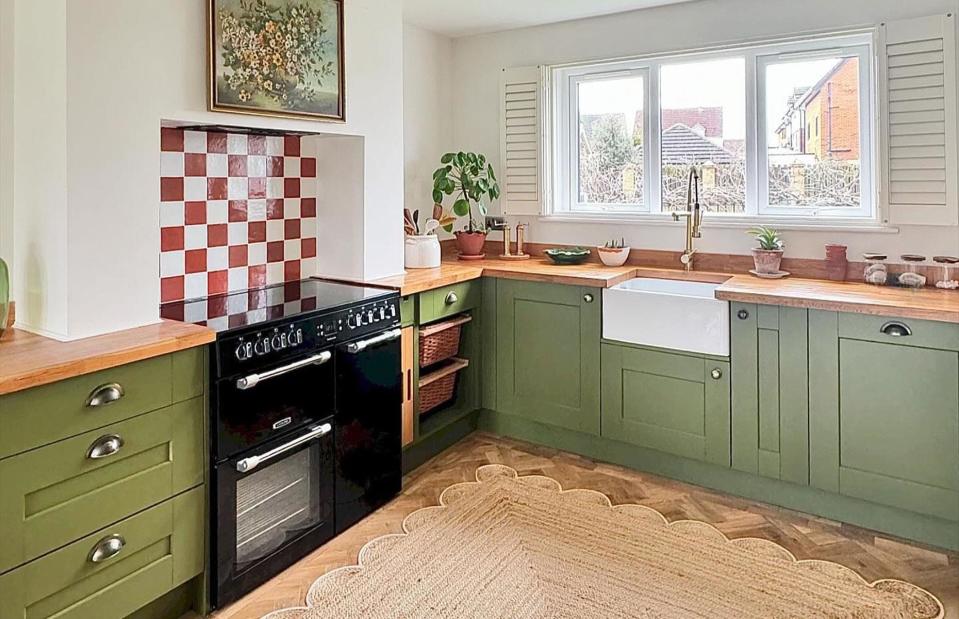
@eli_at_home / Instagram
Tiles are so versatile and hardwearing that there are a million ways to use them. If your left-over tiles won't stretch to lay a full kitchen splashback hone in on one area instead.
@eli_at_home has highlighted her kitchen mantle area with an on-trend checkerboard pattern. The contrasting terracotta and cream tones jump out of the white backdrop and complement the freshly painted green kitchen cabinetry.
Add words to tiles
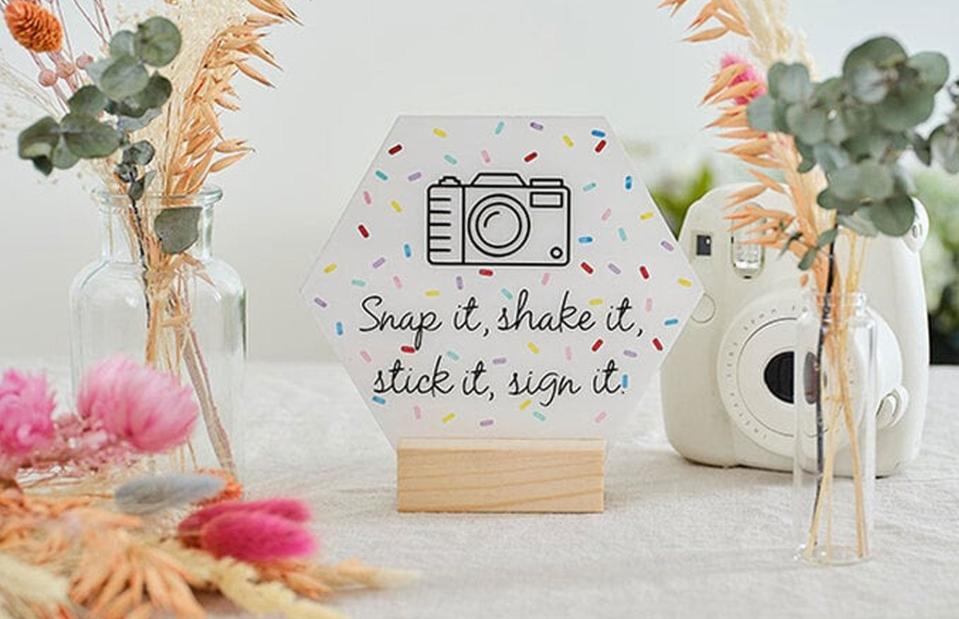
Hobbycraft
Do you have access to a Cricut machine? Then, check out this beginner-friendly idea that makes use of leftover a ceramic tile by adding fun word art.
This project uses an acrylic sign and stand but can be easily achieved using a left-over hexagon-shaped tile to highlight and decorate all sorts of seasonal occasions.
Marvel with a marble tray
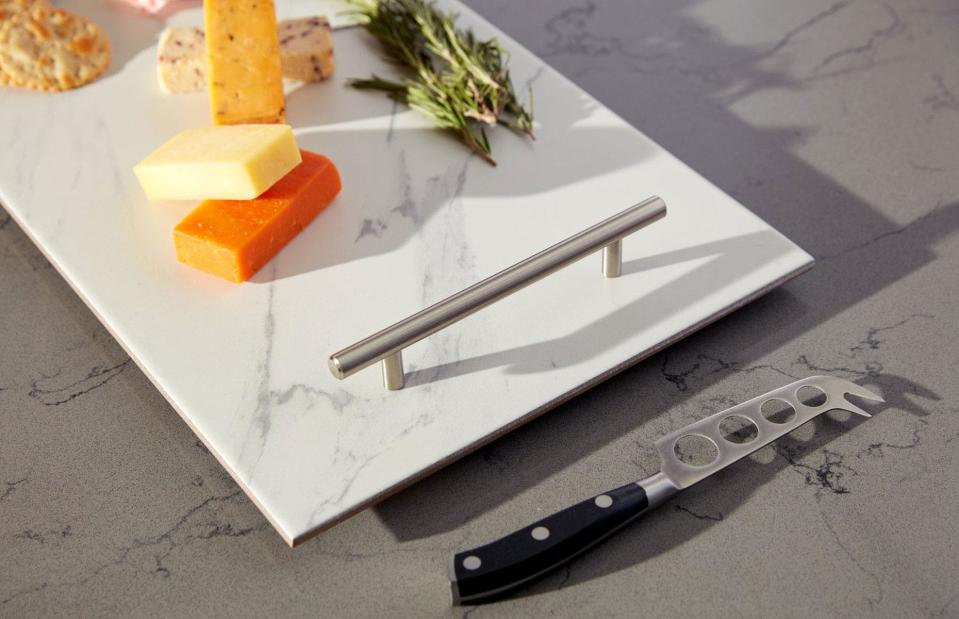
Wickes
Do you have any large marble or marble effect tiles left over from your new bathroom remodel? Put them to good use by making an easy and practical tray.
Choose large format tiles that require no cutting or mess and then add a kitchen cupboard carry handles with super strong glue. Finally, attach self-adhesive protector pads underneath the tray.
Tile up plant pots
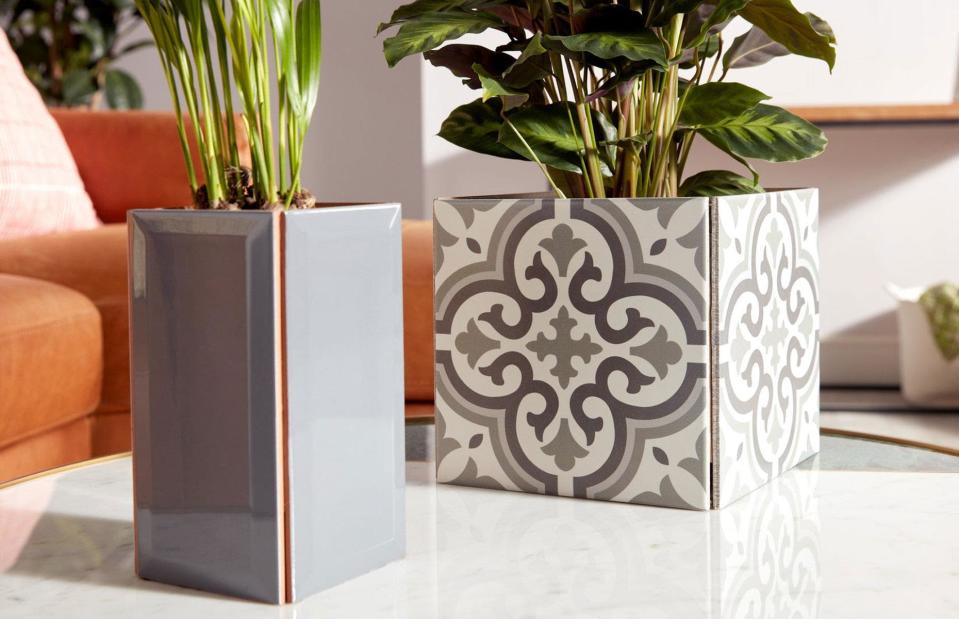
Wickes
Any stylist will tell you that a beautiful home can never have too many plant pots or vases. Sure, we love the classic clear glass versions but how about displaying beautiful blooms and greenery in a container with a touch of texture or pattern?
These statement pieces have been created with complete tiles so no need for cutting. Use L-shaped PVC trim as corner frames and stick the tiles on with superglue to create a cube shape.
Outdoor kitchen top
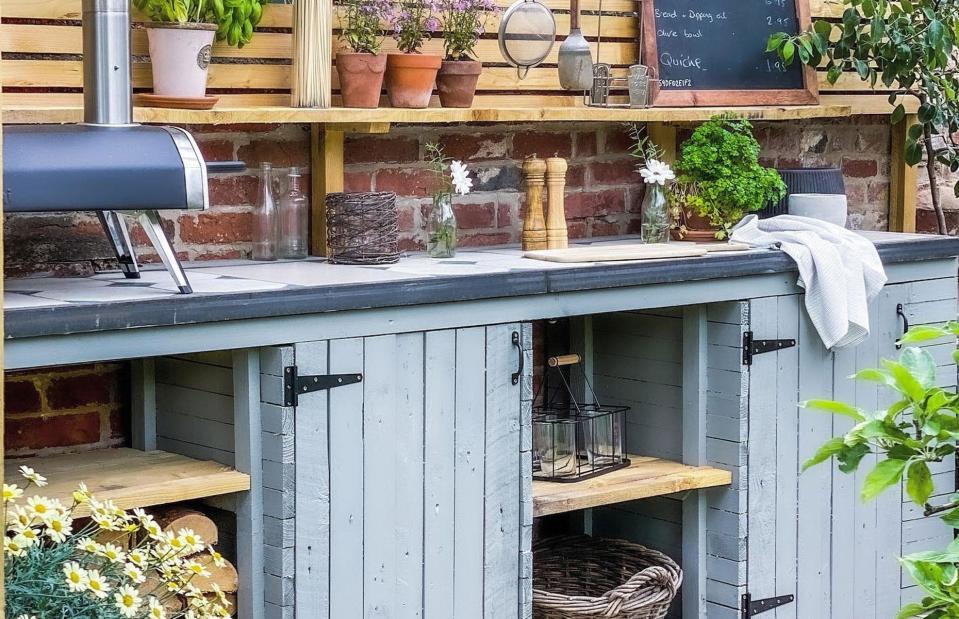
@designermumetc / Instagram
Home and garden enthusiast Annabelle Rogers created this outdoor kitchen using leftover materials and tiles from previous DIY projects. To marvel at all of Annabelle's wow-factor ideas, take a look at her beautiful flower-filled Instagram feed @designermumetc.
The finished kitchen complete with statement tiled worktop cost Annabelle only £40 ($32)!
Streamline fridge magnets
The Merry Thought
Want your fridge magnets to match your kitchen tiles? The Merry Thought has done exactly that. Simply take a sheet of the same mosaic tiles you're using on your walls or floors, cut out the individual tiles and glue magnets to the back with strong glue. It's that easy!
If you didn't choose mosaics for your wall tiles look for the same colour or material instead.
Create simple coasters
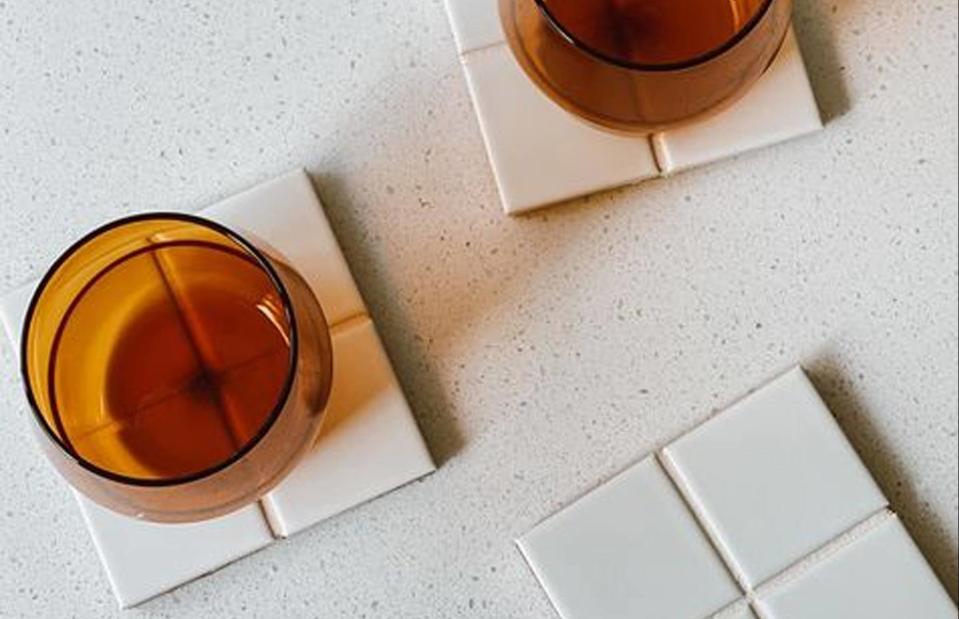
@benchihome / Instagram
Sometimes simple is just perfect. @benchihome made these cube coasters from the leftover tiles from another DIY project.
The linear design and chalky tone make amber tumblers look super chic. Add some rubber pads to the reverse to protect your surfaces from scratches.
Inject colour into a fireplace
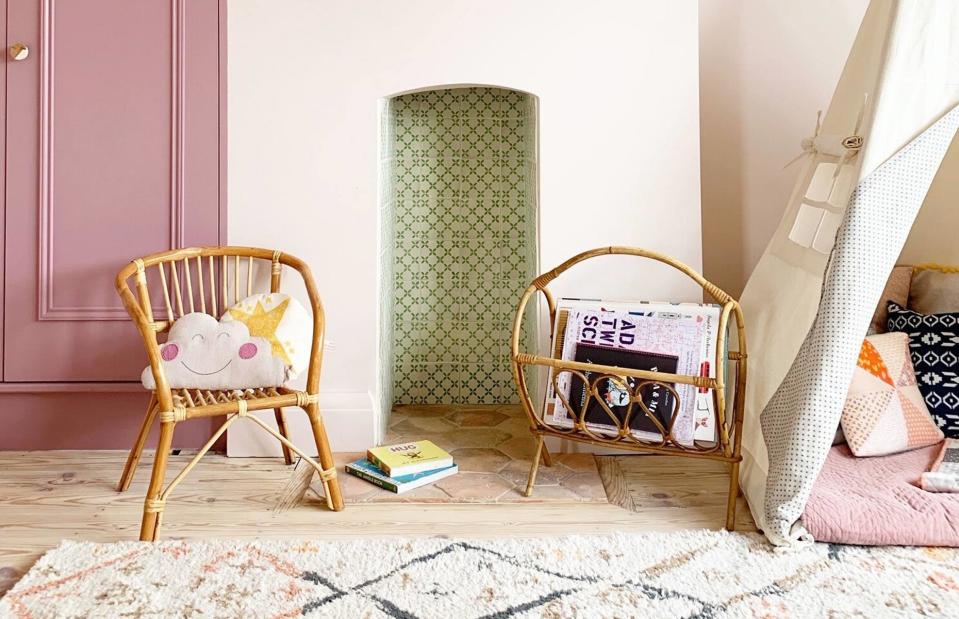
The Otto House
Whether it's adding colour to a fire surround or brightening up the hearth of a disused fireplace, you will only need a few leftover tiles to create beautiful results.
The Otto House knocked through this previously boarded-up fireplace and added beautiful lime green hand-painted wall tiles. The room is now a bright kid's bedroom.
Mosiac crockery
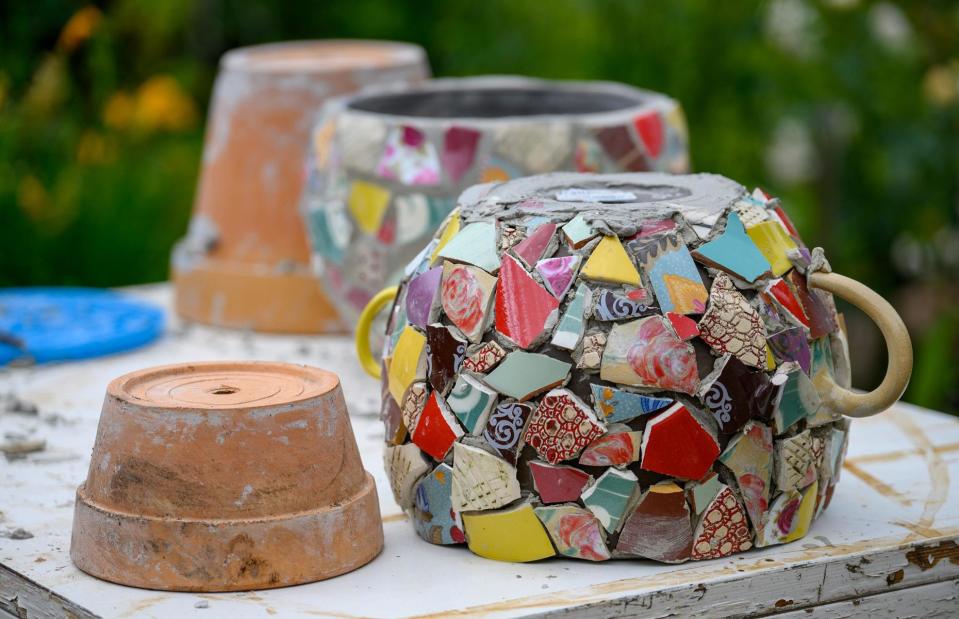
MTalvik / Shutterstock
This pretty set of mugs has been created by breaking up leftover tiles with a small hammer and sticking them onto the surface pot like a freehand jigsaw puzzle. You could try this with other items too, like a vase or a pot.
To create a smooth finish leave gaps in between the jagged tiles and fill them with grout once you've finished your design, sanding any rough edges to finish.
Mount a striking splashback
liloon / Shutterstock
If you've got some striking tiles left over from a previous project, why not use them in a different room to create some cohesive character?
This small-scale kitchen splashback looks fresh and striking made with just a few square tiles set behind the worktop, highlighting where the tea gets made. This trick would look just as appealing in a cloakroom.
Tile the kitchen island
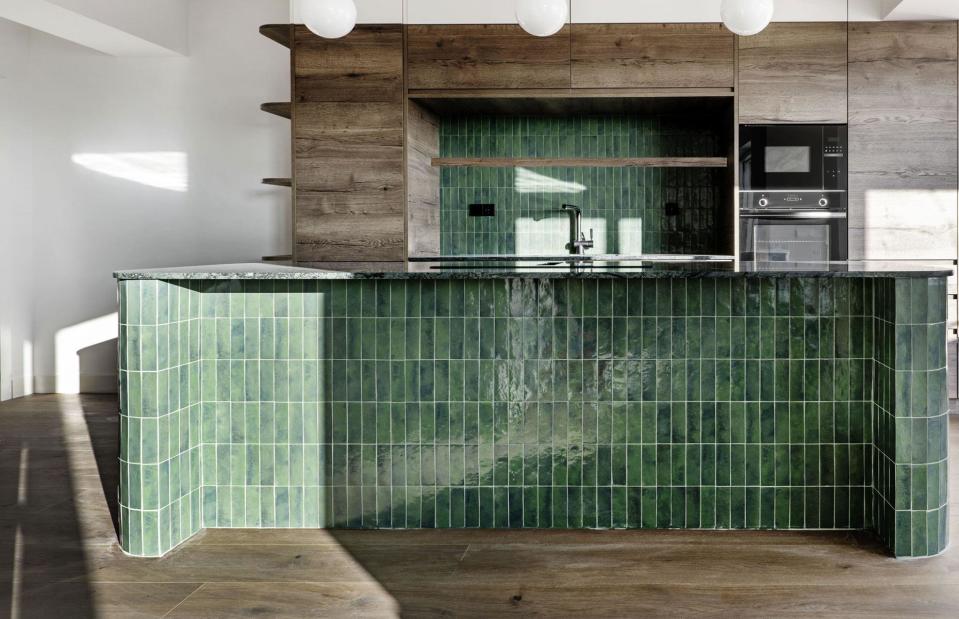
Tomás Llamas Quintas / Alamy Stock Photo
Leftover plain or statement floor tiles can look striking when used on a kitchen island. And they don't even have to match the splashback like in this picture - you can get very creative.
Try patterns, mixing small and larger tiles together or simply covering a strip of the island, it all works. These vintage-style jade green tiles add character to an otherwise plain concrete-wrapped worktop and bar, matching the splashback perfectly.
Add colour to garden walls
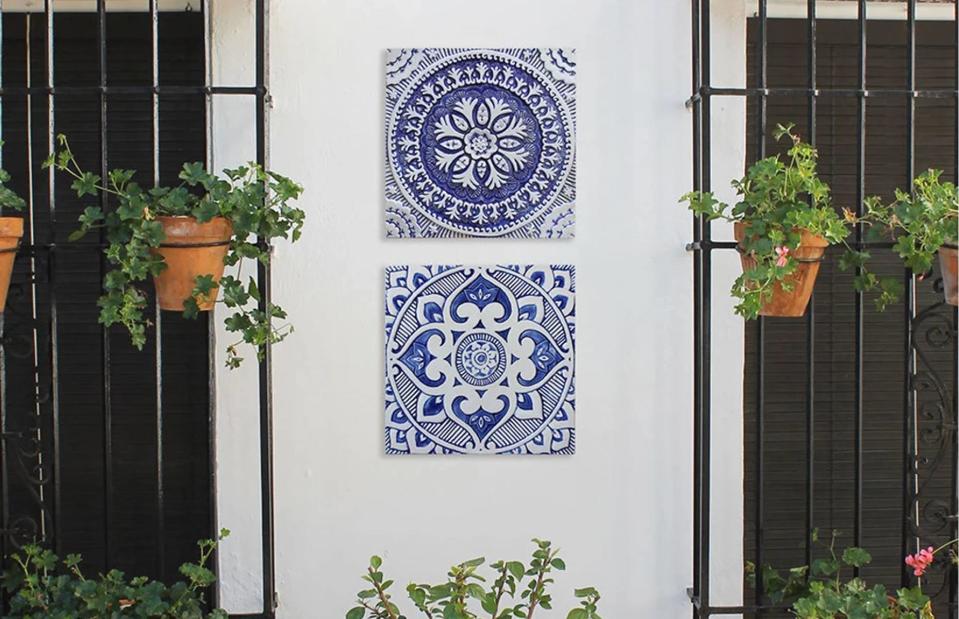
GVEGA / Etsy
Give your garden wall a Mediterranean update by mounting colourful and decorative tiles to white exterior walls. These ones are from Etsy but you can use any tile samples you have at home.
Their glazing will keep them water-tight but you may need to bring them inside during the winter months as frost can make certain materials crack.
Colour up plain tiles
Gisela Graham
If you have lots of plain white tiles going to waste, they make fab mismatched coasters. Get creative with pens and paint and seal with a clear varnish.
These adorable tile coasters are from Gisela Graham, but DIY versions will look just as striking using illustrative printed images and Modge Podge photo transfer glue. Finish with small felt stickers or self-adhesive pads placed underneath.
Take tiles onto the porch
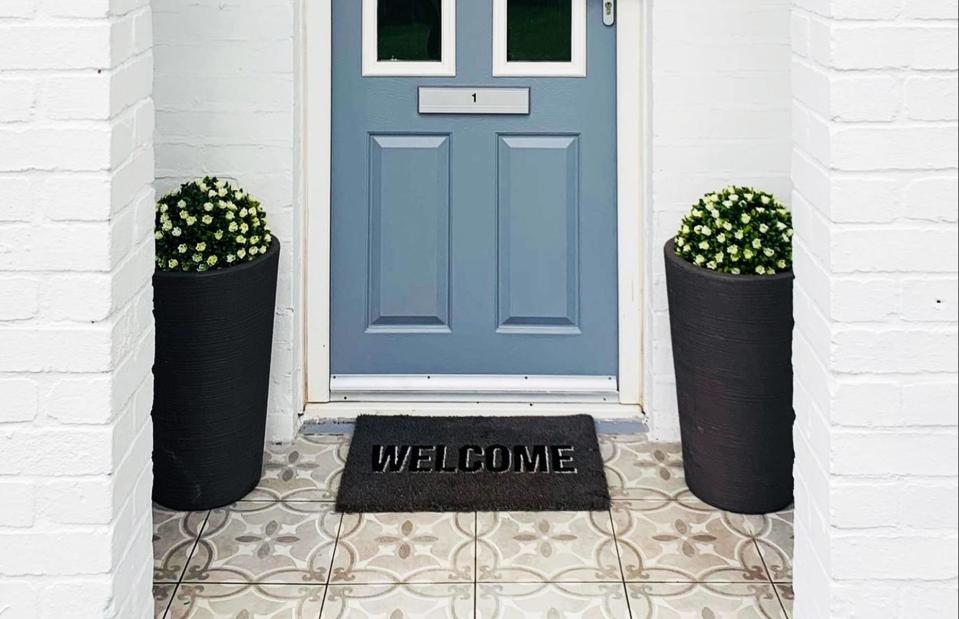
@renovations_of_cheshire / Instagram
Got a few statement floor tiles left over from relaying the hallway? Continue the look into the porch for a streamlined welcome.
@renovations_of_cheshire gave this porch a whole new look by repainting the front door a fresh shade of blue which offsets the neutral-toned tiles.
Brighten up a lamp base
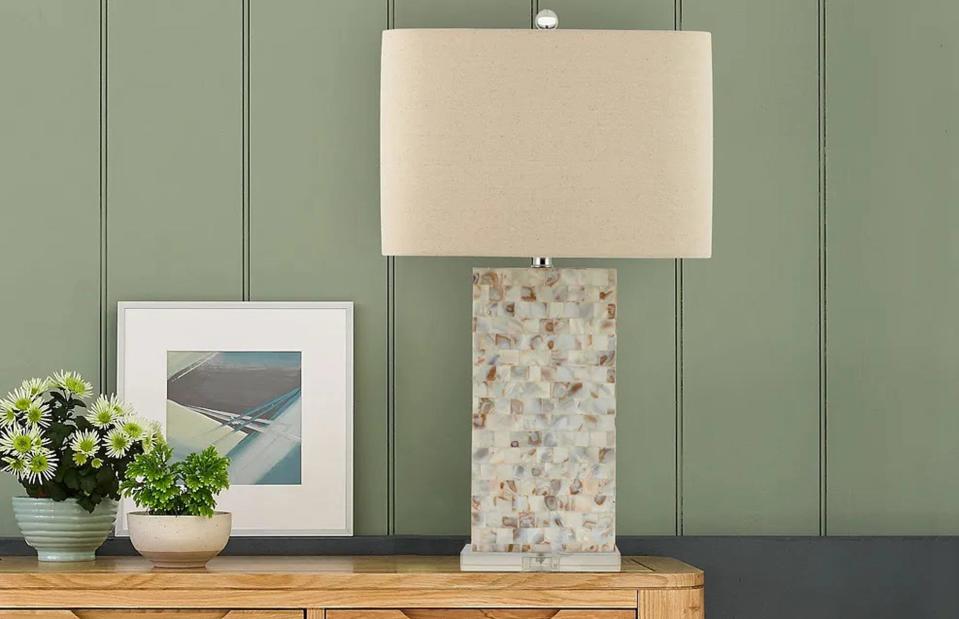
Oak Furniture Land
A rectangular but dull table lamp makes an ideal canvas to warm up with leftover mother-of-pearl mosaic tiles too pretty to throw away.
The iridescent finish will sparkle when the light is turned on creating a delightful glow.

